
How to Read Your Human Design Chart Explained:
The Ultimate Beginner’s Guide
NEXT POST
PREVIOUS POST


If you’re anything like me, from the moment you stumbled upon Human Design, you were instantly intrigued:

A quick Google and a few taps later, you generated your Human Design chart, eager to see what insights it would reveal aaand…
Instead found yourself staring at a strange combination of shapes, lines, numbers and symbols wondering “WTF am I looking at? and “Is it even worth my time to figure it out?”
(Take it from me, someone who was initially skeptical – the answer is an emphatic YES!).
I’ve been there – feeling excited and intrigued yet frustrated and lost, all at the same time.
I searched high and low for a simple, comprehensive guide to help me make sense of everything, but all I could find was confusing and contradicting information online and hefty price tags for certification programs that went way beyond what I was looking for.
Now – after hours spent reading, watching, learning, experimenting, and piecing it all together – I’m here to help you ditch the confusion and overwhelm!
Welcome to my “Intro to Human Design” series, where I’ll be your personal guide, walking you step-by-step through decoding each element of your Human Design chart, so you can dive confidently into your own journey of self-exploration and begin experiencing the incredible freedom and transformation that comes with living life by Design.
Here’s What We’ll Cover in This Post:
- What is Human Design?
- How to Get Your Human Design Chart
- Your Human Design Chart Explained
- The 5 Human Design Types
- Strategy
- Signature & Not Self Theme
- Authority
- Profile
- Energy Centers
- Definition
- Gates
- Planets
- Channels & Circuitry
- Incarnation Cross
- Variables (Arrows)
- The 5-Step Process for Reading Your Own Chart
- Diving Deeper: Your Next Steps
Without further ado… let’s get started!
What is Human Design?
Have you ever taken a personality test and found yourself nodding along as you read the results thinking, “Yep, that’s totally me!”?
Or read a horoscope and found it almost creepy how they seem to know EXACTLY what’s going on in your mind?
Human Design is kind of like that, but it takes things to a whole new level.
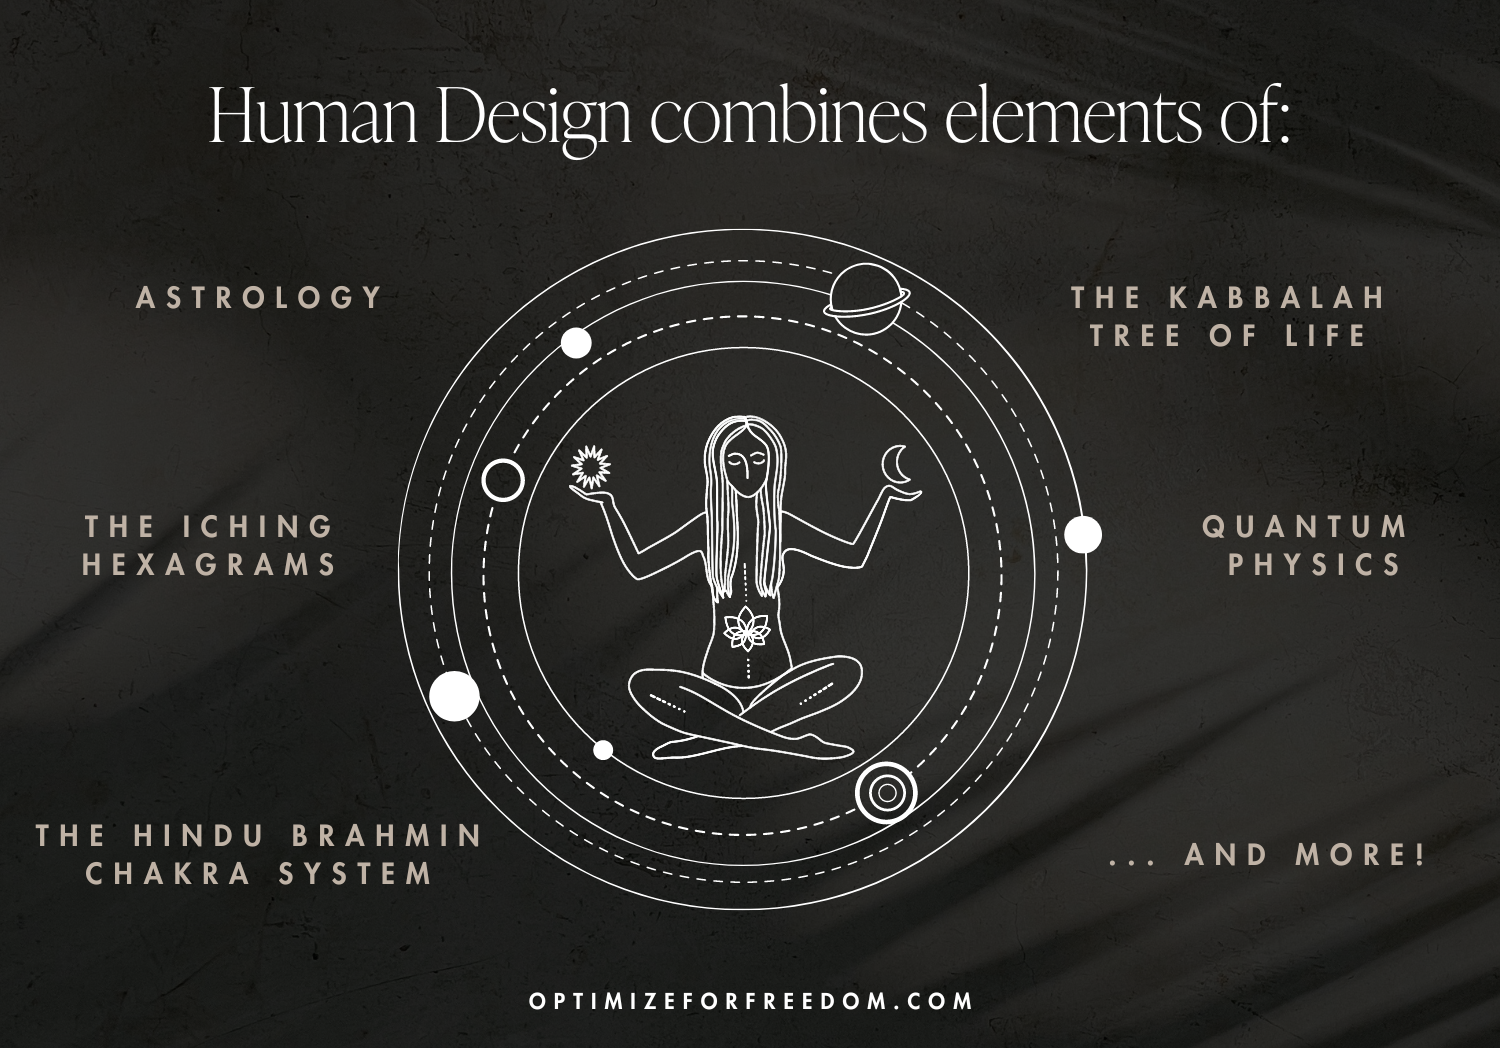
Known as the “Science of Differentiation”, the Human Design system combines elements of astrology, the Chinese I Ching, the Hindu Brahmin chakra system, Kabbalah and quantum physics to create a highly personalized framework for aligned living.
It’s essentially like being handed your own user operating manual, hand-crafted by the Universe 🤯
One of my favorite aspects of Human Design is that it acknowledges that there’s no single “right” way to live and that what’s best for me, may not be (and likely isn’t) what’s best for you.
Instead of forcing you to fit yourself into someone else’s box of what you should be or do, Human Design invites you to have an open mind, look within, and experiment until you find what feels best.
As you continue on your Human Design journey, you’ll learn:
- How to move from confusion to clarity by using your personal strategy for aligned decision-making.
- The ways your unique energy influences every interaction you have and why you seem to “click” more with some people than others.
- Your inherent strengths and the special gifts you bring to the table in personal and professional settings.
- Your potential pitfalls and challenges, including areas where you may be more vulnerable to the influence of others.
- The core values and principles that motivate you in life, even if they’ve been buried beneath years of societal expectations.
- How to tailor your environment and daily routines to harmonize with the natural rise and fall of your energy.
… and that’s just the beginning!
Over the past year and a half, Human Design has become my secret weapon for beating burnout, building self-trust, and feeling clear and confident in my decisions. And now, I’m so excited to share it with you!
So… are you ready? Grab your chart, take a deep breath, and let’s dive in!
How to Get Your Human Design Chart
Still need to generate your chart? No worries! Here’s what to do:
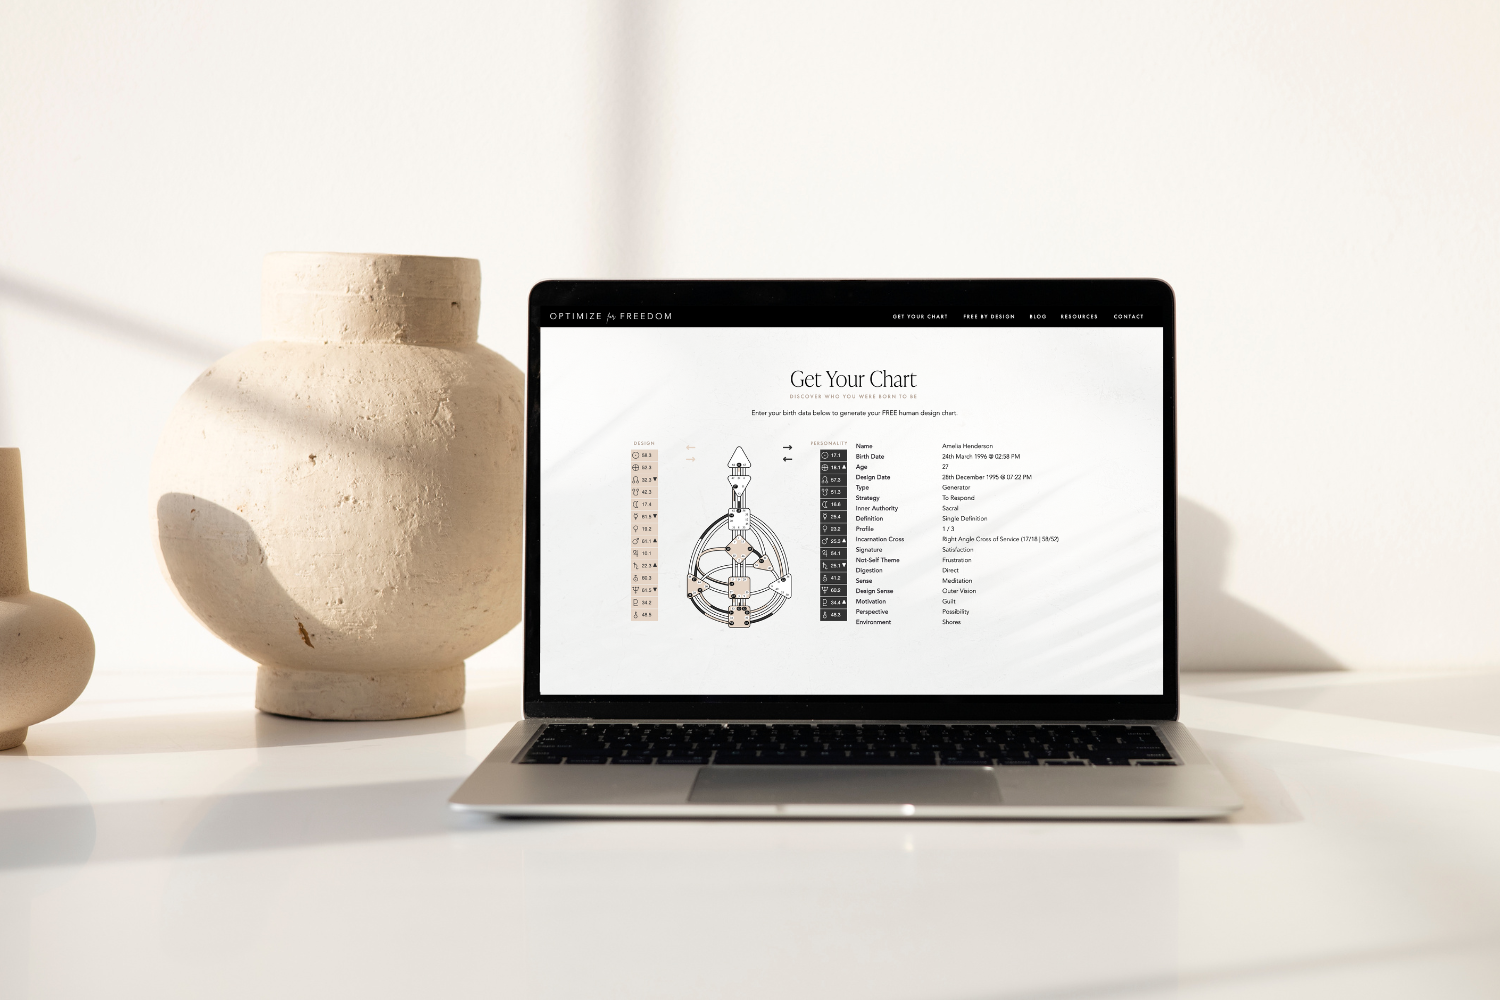
Visit my free Human Design chart generator: Start by clicking on this link or on “Get Your Chart” in the navigation bar above to be taken to my free chart generator.
Enter your birth details: Once you’re on the page, you’ll see a form asking for your birth info. Type in your full birth date (day, month, and year), the exact time you were born, and your birthplace.
Generate your chart: Now just hit the black ‘View Your Chart’ button and voilà! Your personalized Human Design chart should now be visible on the screen.
Save it for later: You’re going to want to reference this later so be sure to take a screenshot or download your chart as a PDF.
Now grab a cozy blanket and your favorite drink (it’ll be an iced coffee with almond milk for me!), and let’s begin to break down what all these shapes, lines, and colors actually mean!
⏰ Don’t Know Your Birth Time? ⏰
You’re not alone! Many people aren’t sure of their exact birth time. If you find yourself in this boat:
- Check Your Birth Certificate: This is the most reliable place to find your time of birth.
- Ask Relatives: If you’re unable to track down your birth certificate, ask parents or other family members who might remember or have kept records.
- Approximate: If you can’t determine the exact time, you can guess based on the time of day you were born. Or, you can try plugging in a few different times and see which results resonate with you most deeply. This will provide a general chart, but keep in mind that specific aspects might vary.
- Professional Services: Consider reaching out to a professional astrologer. Some offer ‘birth time rectification’ services which help narrow down your likely birth time.
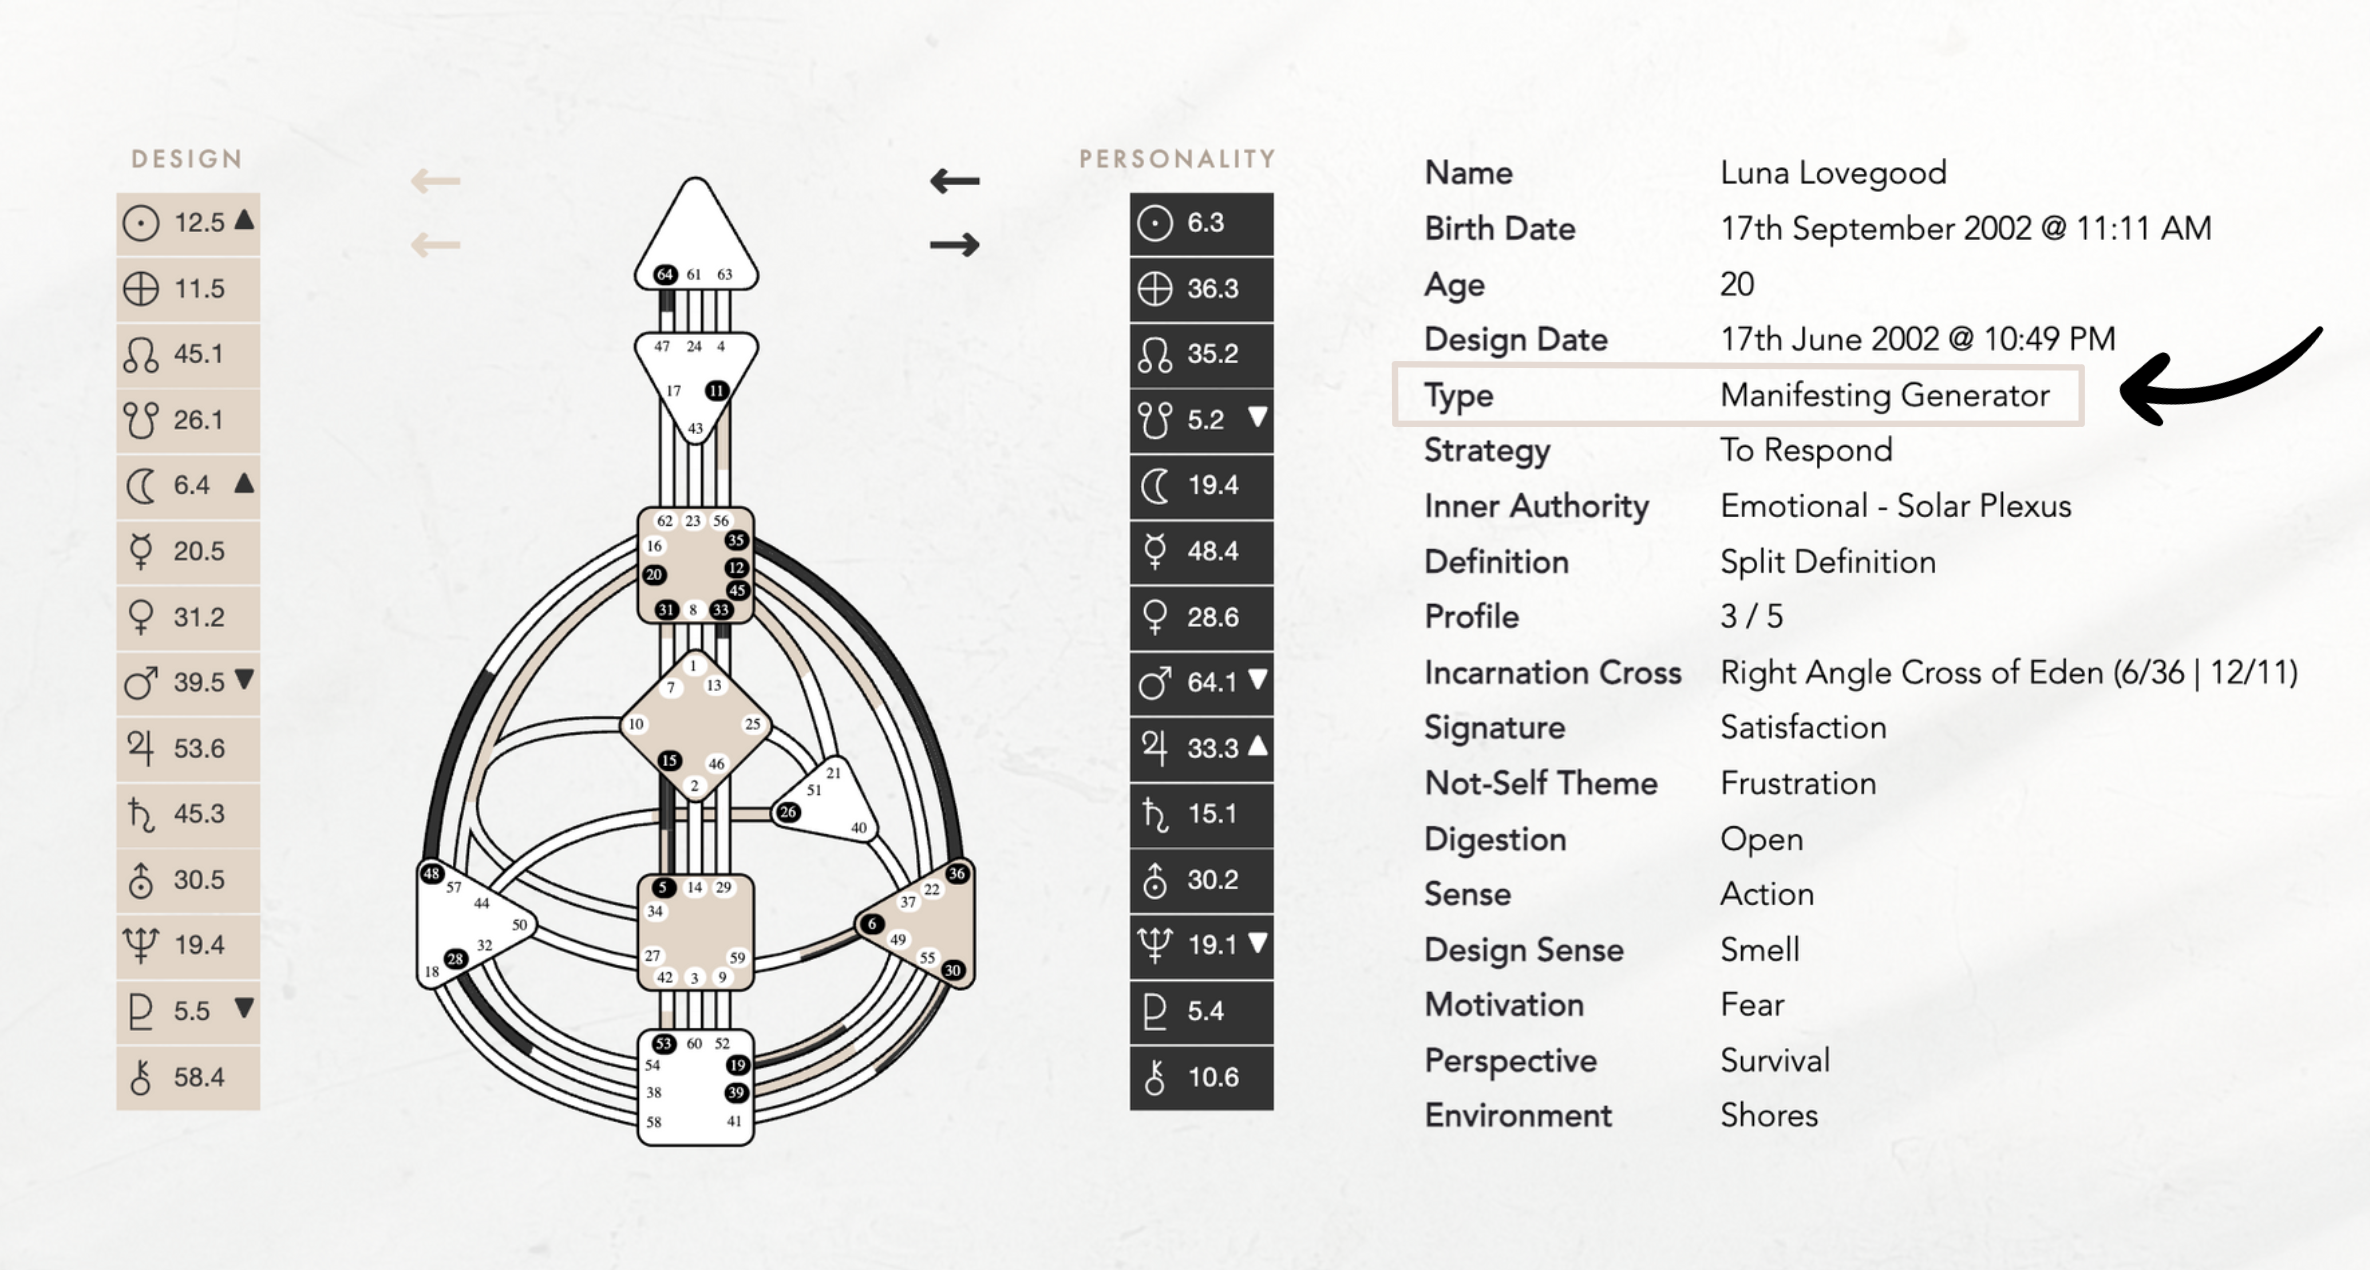
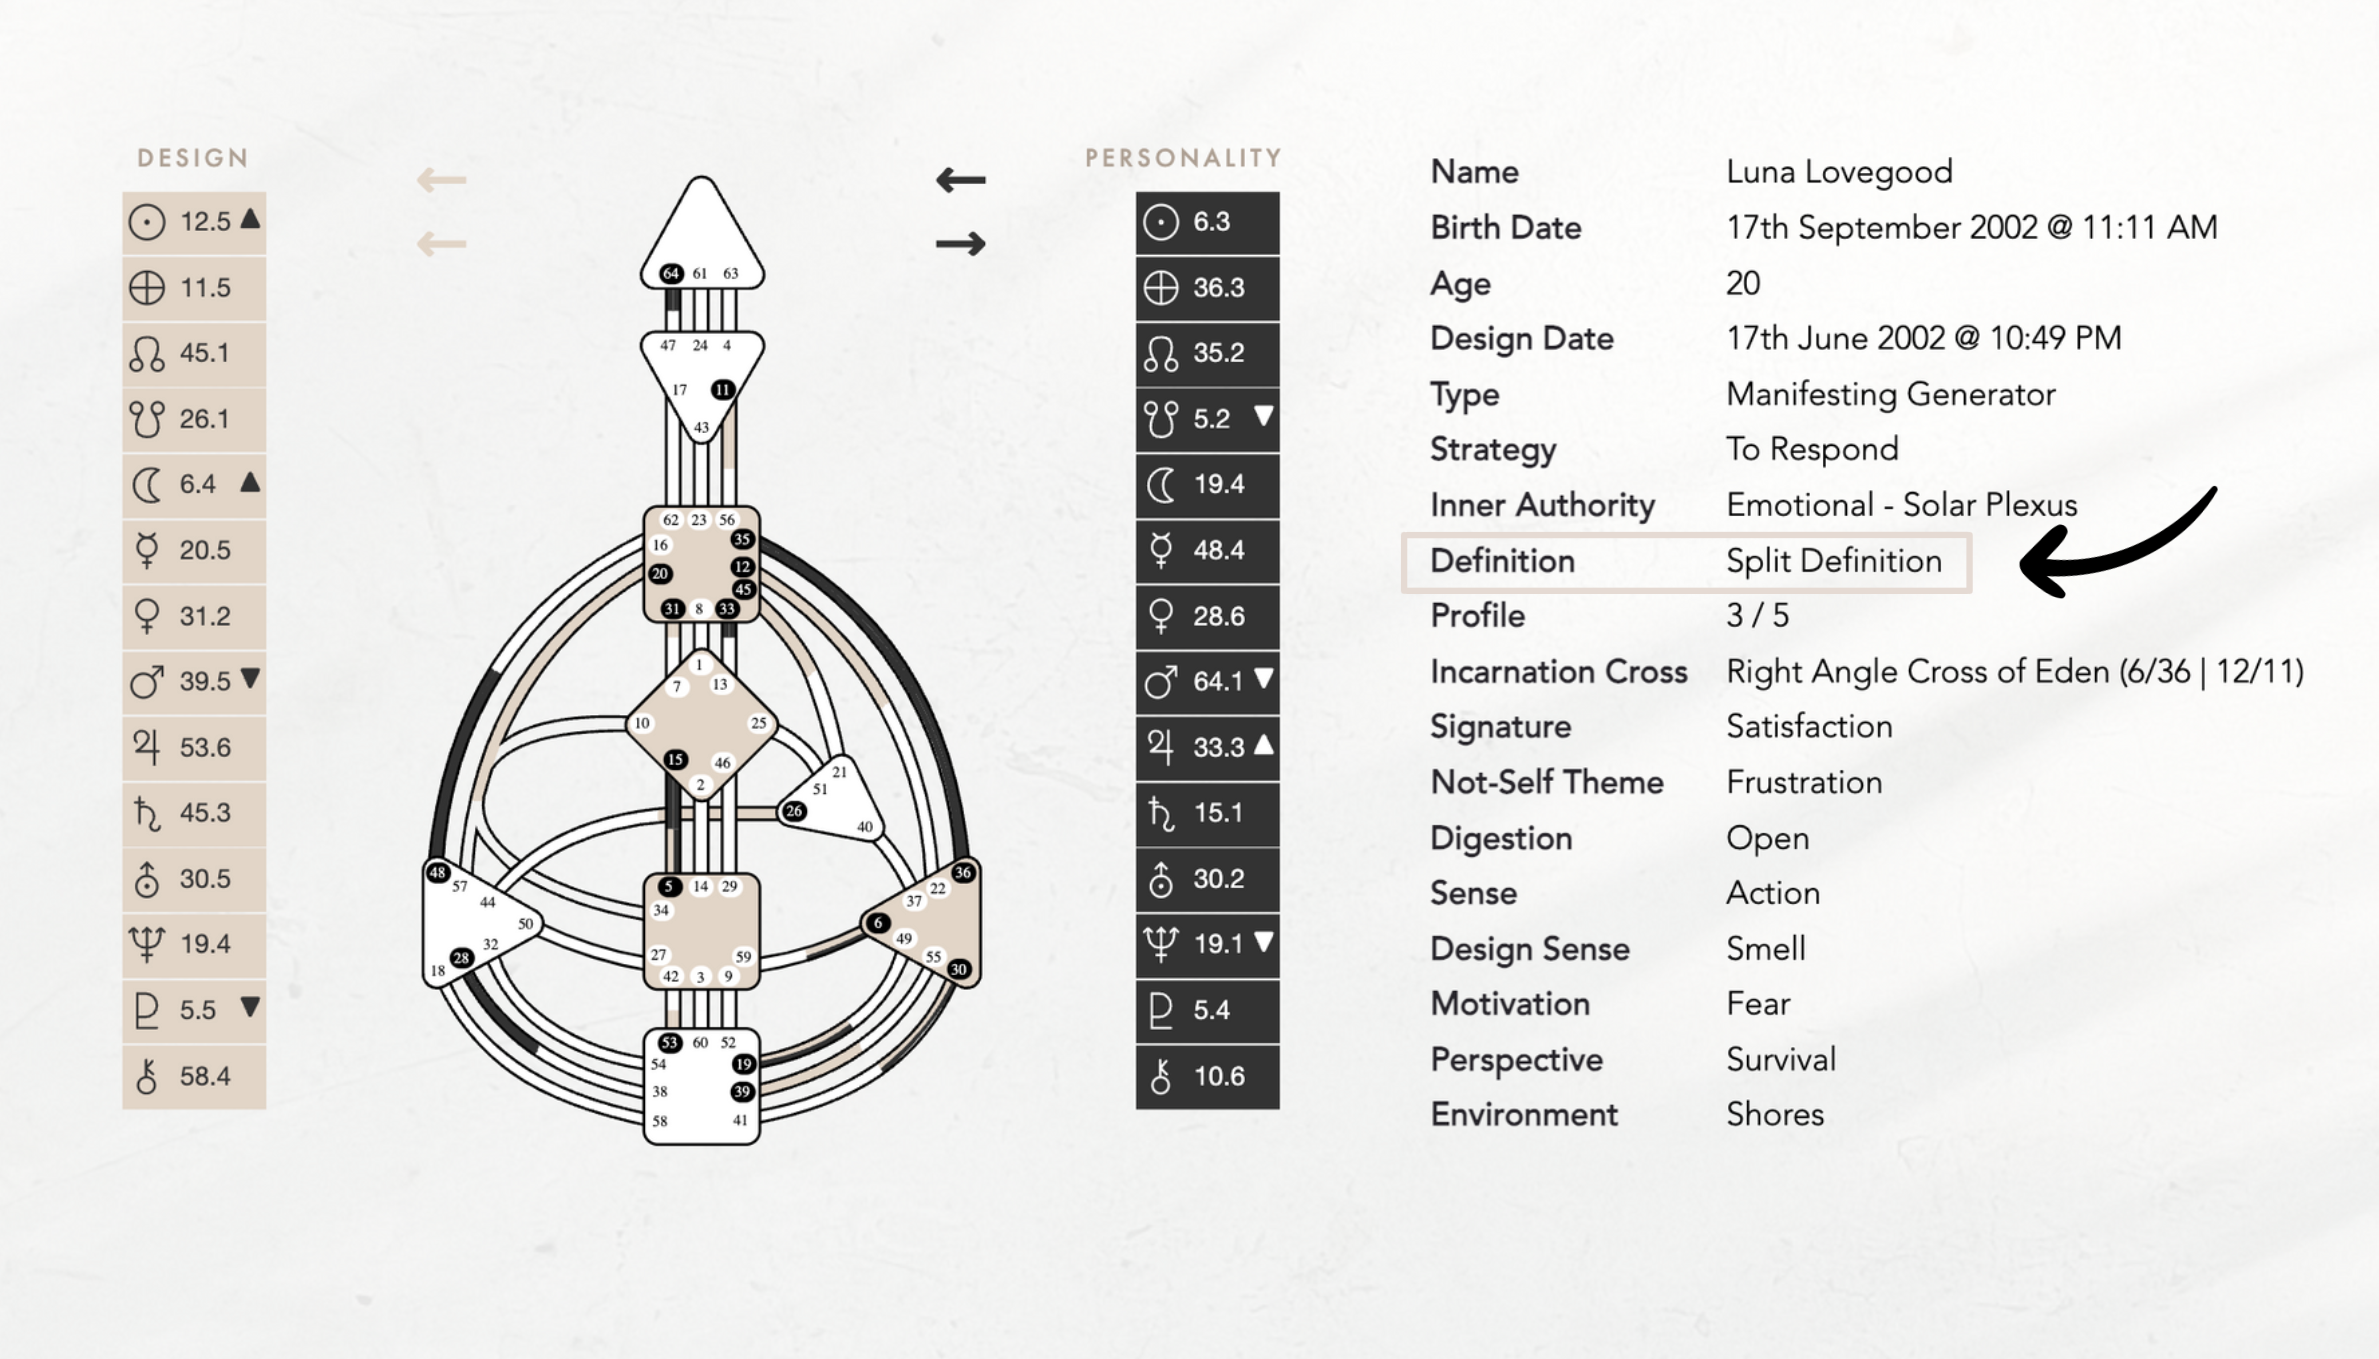
Your Human Design Chart Explained
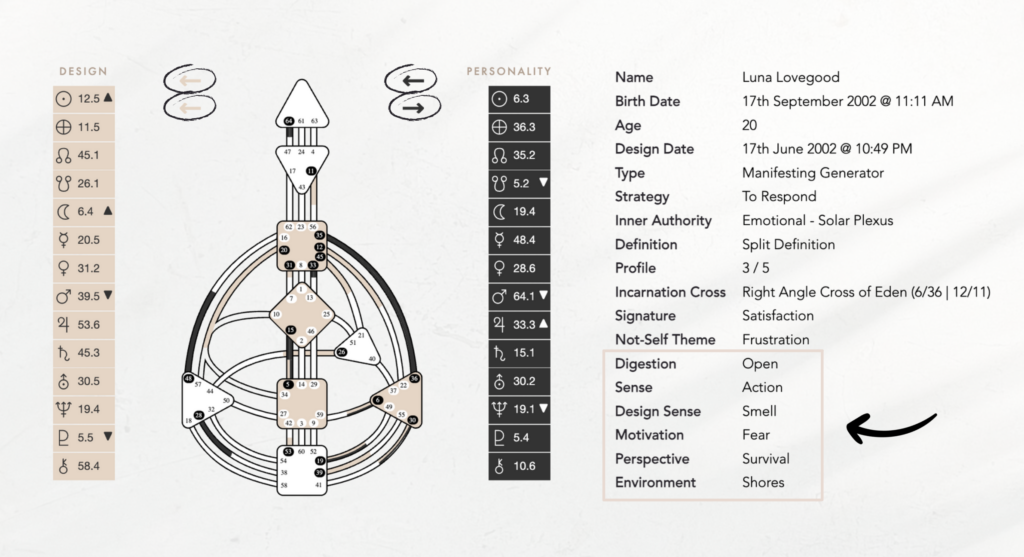
Your Human Design chart is divided into two main parts:
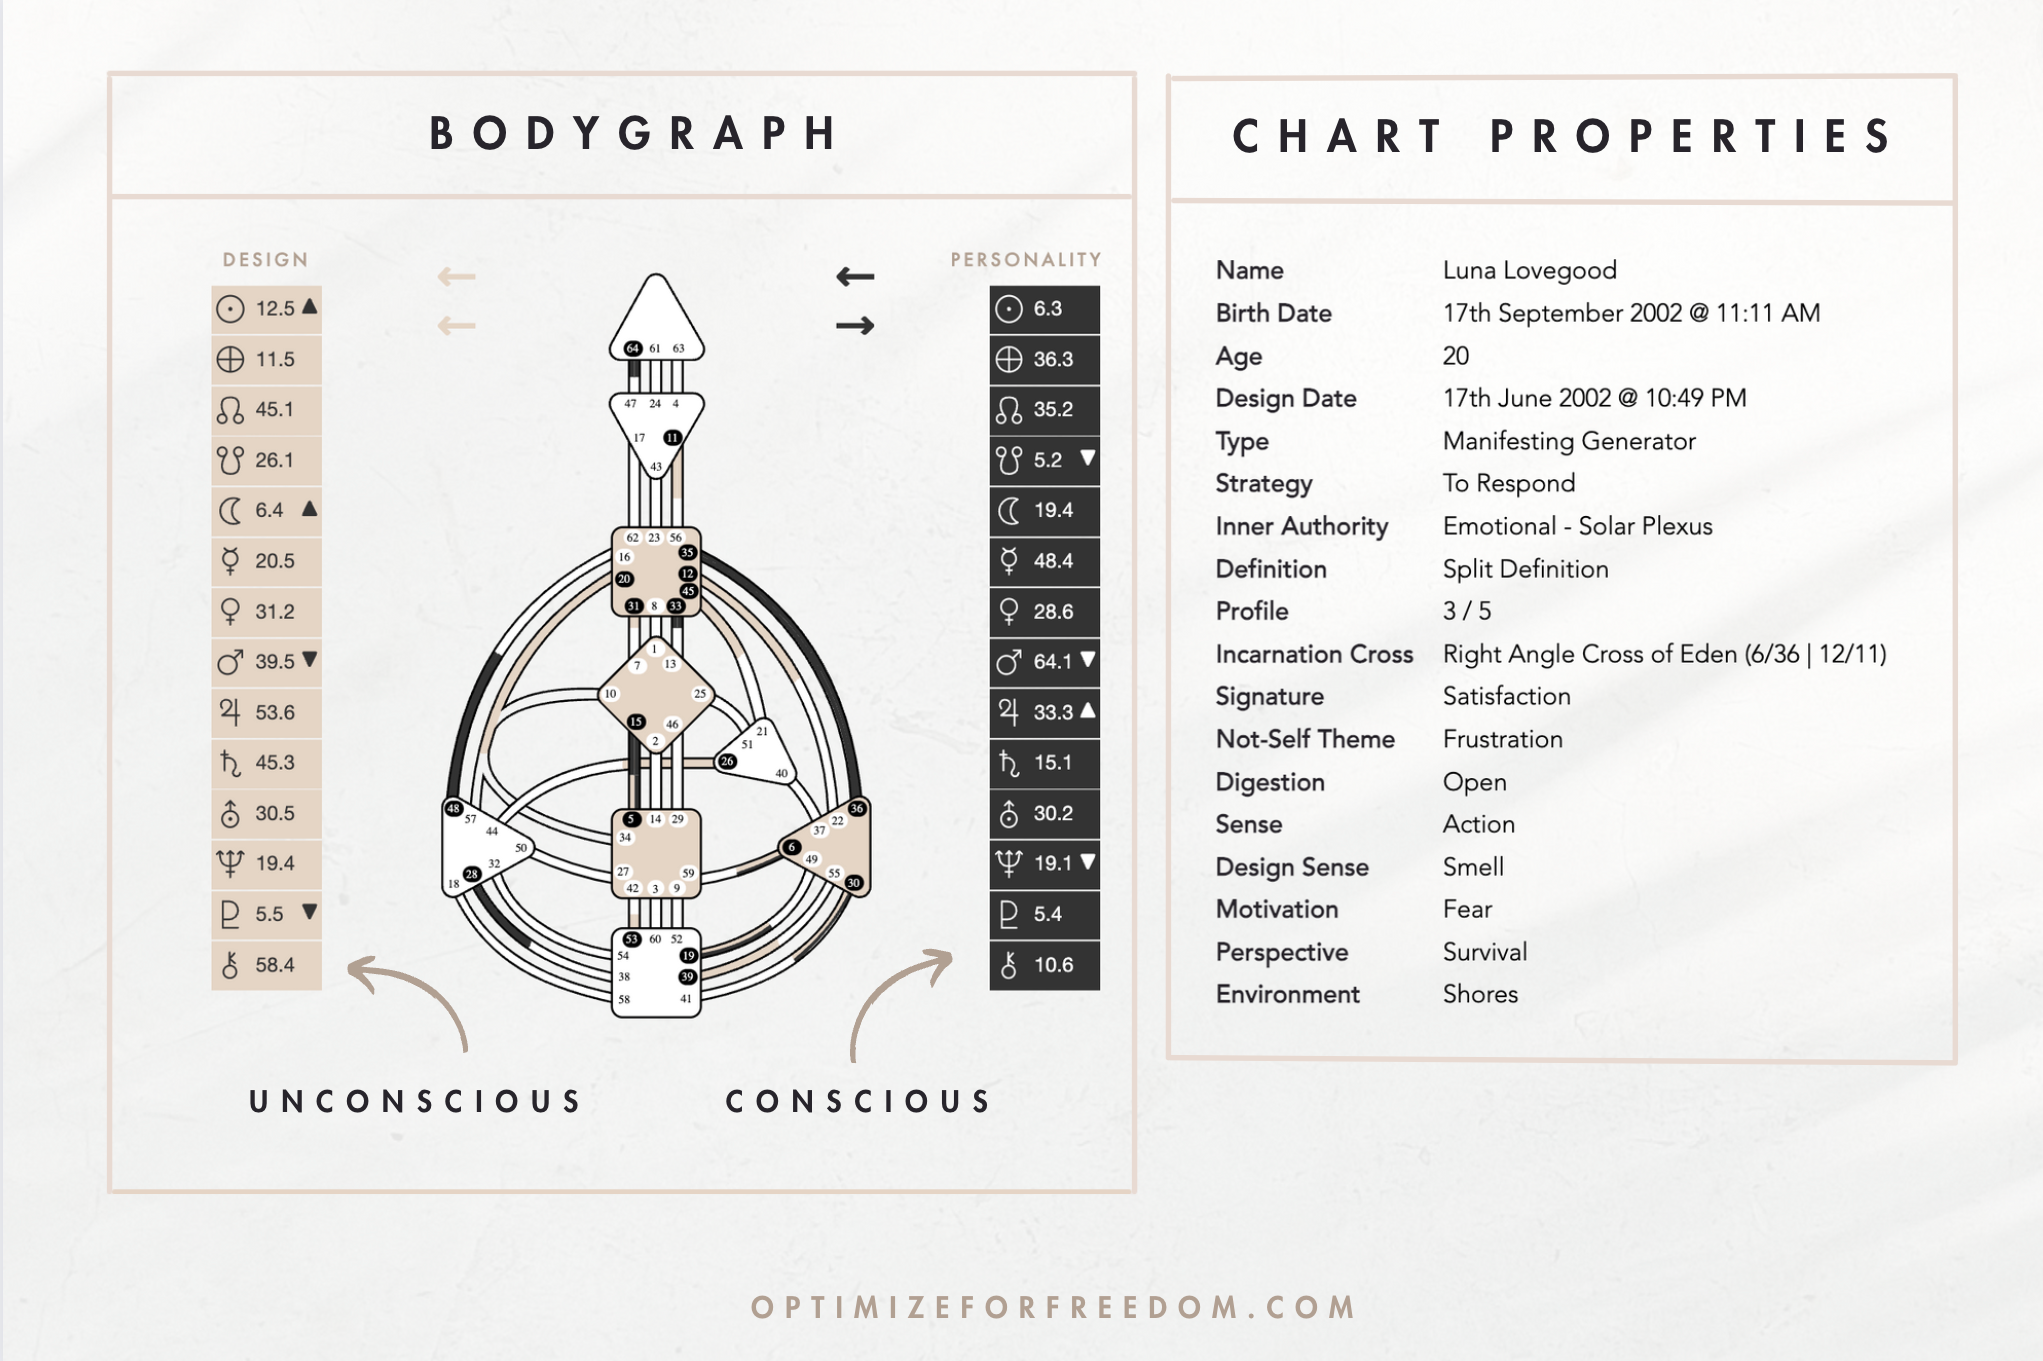
On the right, there’s your list of chart properties. (Don’t worry if the terms listed here are unfamiliar. We’ll go through them one-by-one in this post.)
On the left, you’ll see your BodyGraph. You can think of this as a blueprint or a map of how you process energy. Within it lies information detailing your strengths, challenges, and the role you’re here to play in life.
You’ll also see two columns of boxes flanking the BodyGraph on each side:
The lighter boxes tell you about the position of the planets around 3 months before you were born. This data represents your unconscious personality (or “design”). It provides a snapshot of the innate tendencies and underlying predispositions that consistently guide and shape your behavior, often without you even being aware of it.
The darker boxes represent the position of the planets at the exact time of your birth, forming your conscious personality. These are the parts of yourself that you likely recognize and identify with.
Together, these conscious and unconscious elements fuse together to form the unique blend of energies that makes you, well… you!
So, in a nutshell, light = unconscious, dark = conscious, and it all ties back to where the planets were hanging out when you were born.
Got it? Okay, let’s keep moving!
The 5 Human Design Types
The first piece of information you’ll see under your name and birth data is your Type. Your Type determines your natural role and how you’re wired to interact with the world around you.
Everyone belongs to one of the five Human Design Types. They are:
Manifestor: The Trailblazer
Manifestors are here to initiate and set things in motion. With an innate drive to blaze new trails and make things happen, they don’t wait for permission – they’re wired to follow their urges, take the first step and inspire action in others.
Generator: The Powerhouse
With access to a powerful reservoir of sustainable energy, Generators are the great “doers” of the world. Here to turn visions and ideas into reality, they are drawn to pursuits that genuinely captivate them and thrive when immersed in projects and roles that align with their passions, ensuring they’re both productive and fulfilled.
Manifesting Generator: The Multi-Passionate
Combining the visionary spark of Manifestors with the enduring energy of Generators, Manifesting Generators are a force to be reckoned with! These people are dynamic doers who can both kick things off and carry them to completion. When pursuing what excites them, they have the unique ability to juggle several different projects and roles with ease.
Projector: The Guide
With a unique perspective and clear vision, Projectors excel at seeing patterns and potential. Through their practical and wise solutions as well as their leadership and intuitive insights, they play an essential role in guiding, advising, and helping others channel their energies productively and purposefully.
Reflector: The Mirror
Highly attuned to their environment, Reflectors act as mirrors that absorb and reflect the energy around them to create a clear image of the health and wellbeing of their communities. Reflectors are deeply empathetic and offer unbiased perspectives, making them valuable advisors and consultants.
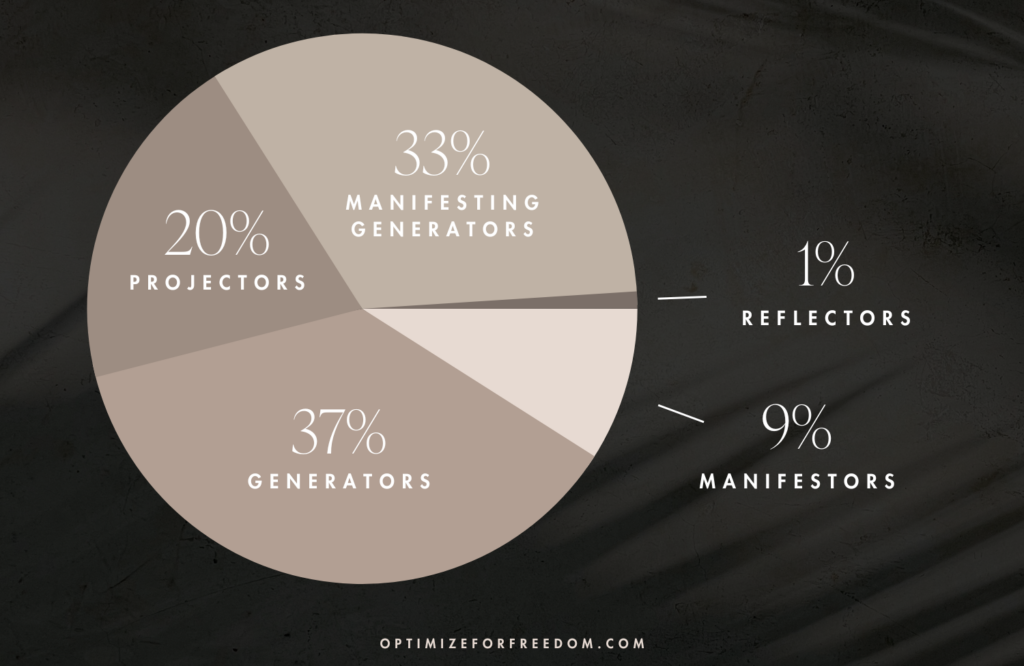
*Please note these numbers are approximations and may vary slightly depending on the source.
Understanding your Type can help you optimize how you use your energy. It’s kind of like knowing your role in the race of life:
Are you a sprinter, built for quick, powerful bursts of speed (Manifestors), or a marathon runner with sustained, steady endurance (Generators)?
Are you the coach on the sidelines, guiding the athletes to achieve their fullest potential (Projectors) or are you the sports reporter, offering an observational, unbiased perspective (Reflectors)?
Trying to force yourself into the wrong role is a recipe for burnout and frustration.
So now that you know your Type, how can you actually start to use this information?
That’s where strategy comes in…
Strategy
In Human Design, each Type has a corresponding Strategy. Your Strategy describes how aligned opportunities will present themselves to you.
When you follow your Strategy, you’re able to navigate life in a way that maximizes ease and minimizes resistance.
Katie from Sort of Spiritual uses an analogy that I really like to describe this: Imagine you’re walking through a forest filled with dense brush.
Sure you can struggle your way through the brush, carefully navigating thorn bushes and climbing over boulders, but it probably won’t be all that pleasant and it definitely won’t be easy.
Now imagine there’s a hiking trail that cuts right through this same forest. It’s going to be a lot easier to navigate and make your way through, right? And hey, you may even find that you enjoy the journey more than the destination!
This is what following your Strategy does – it allows you to find your own “clear path” through the endless options and messiness of life and helps you take the most effective, efficient and most importantly – enjoyable route to your goals.
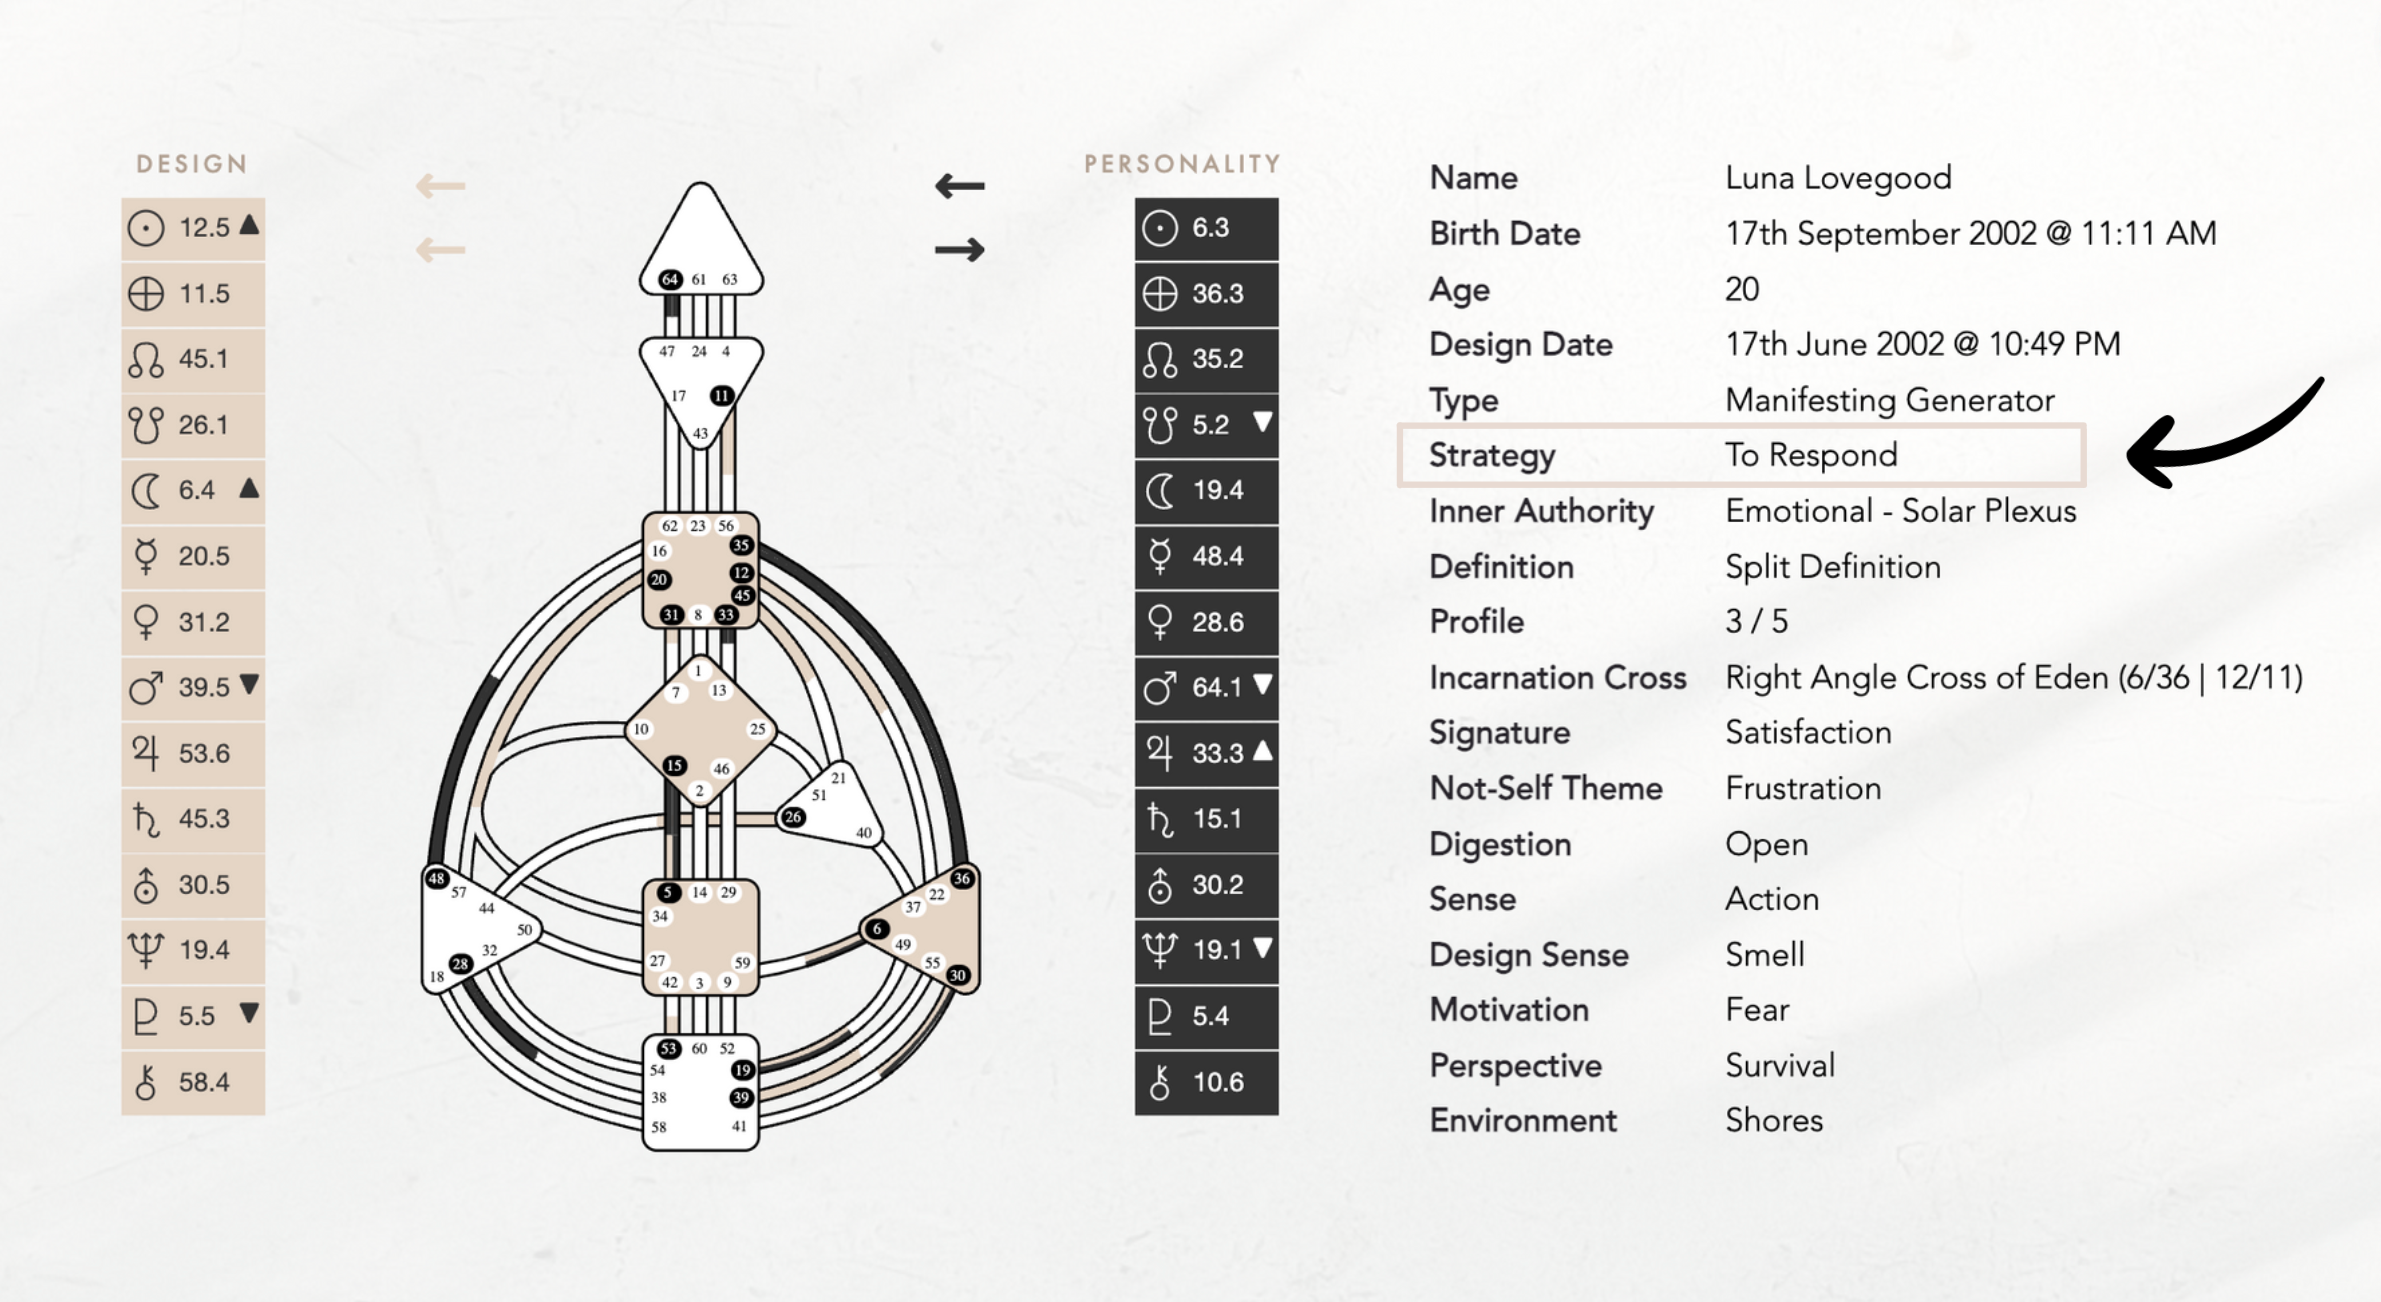
There are four Strategies in Human Design. Yours will depend on your Type:
Manifestor: To inform and initiate
As a Manifestor, you’re designed to get things started and initiate action. Your Strategy advises you to share your intentions with those who will be impacted by your actions before you set things in motion.
This proactive communication paves the way for a smooth journey and minimizes potential roadblocks by setting expectations, ensuring you can bring your visions to life with greater ease.
Generators & Manifesting Generators: Wait to Respond
As a Generator, you have the powerful gift of Sacral response — a gut feeling or intuitive pull that either feels like a distinct ‘yes’ or ‘no’ when presented with a decision or opportunity. When you wait to respond, you’re able to tap into this innate bodily wisdom and make choices that optimize your energy and increase your satisfaction in work and life.
Projectors: Wait for the Invitation
Ever been given unsolicited advice? It’s usually not well-received! With your natural ability to provide direction and insights, you often know what’s best for others before they know it themselves. By waiting for an invitation to share, you ensure your insightful leadership and expertise is welcomed, acknowledged, and truly appreciated by others.
Reflectors: Wait a Lunar Cycle
As a Reflector, you thrive on patience and perspective. Before making any major decisions, it’s crucial for you to immerse yourself in environments where you can experience a diverse range of feelings and perspectives. By sampling many different energies, you’re able to arrive at well-informed, aligned decisions.
At first glance, your Strategy may seem confusing, impractical or like it doesn’t quite resonate with how you naturally operate. That’s okay!
Later in the series, we’ll dig into the nitty-gritty details of each Strategy and how you can start experimenting with yours.
Authority
So, you’ve learned about your Strategy and you know how aligned opportunities are designed to come your way, but how do you know which are a “yes” and which are a “no”?
Enter: Authority 🌟
Typically, we’re taught to be “logical”, to weigh the pros and cons of every decision carefully, and use our minds to “think it through”. But Human Design takes a different approach, relying on deeper sources of innate bodily wisdom.
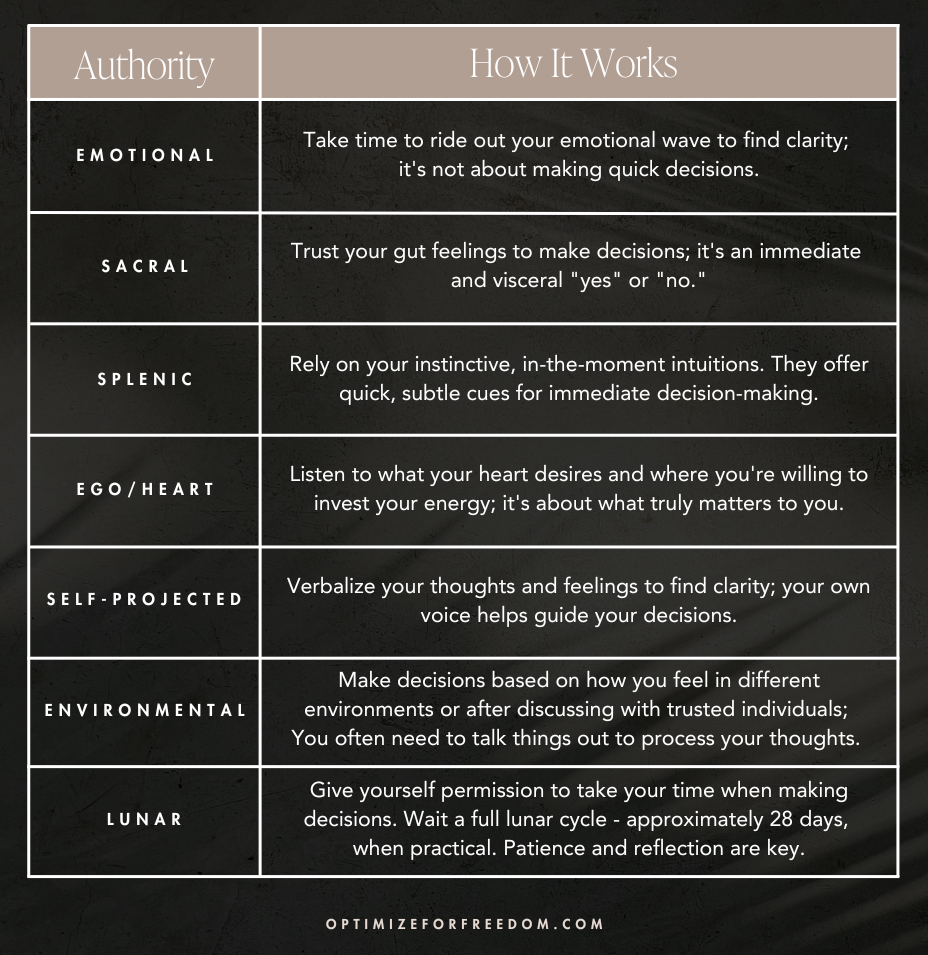
There are seven Authorities in Human Design, each with a different way of communicating what’s right for us. You will have one primary Authority, which you can find listed under your Chart Properties.
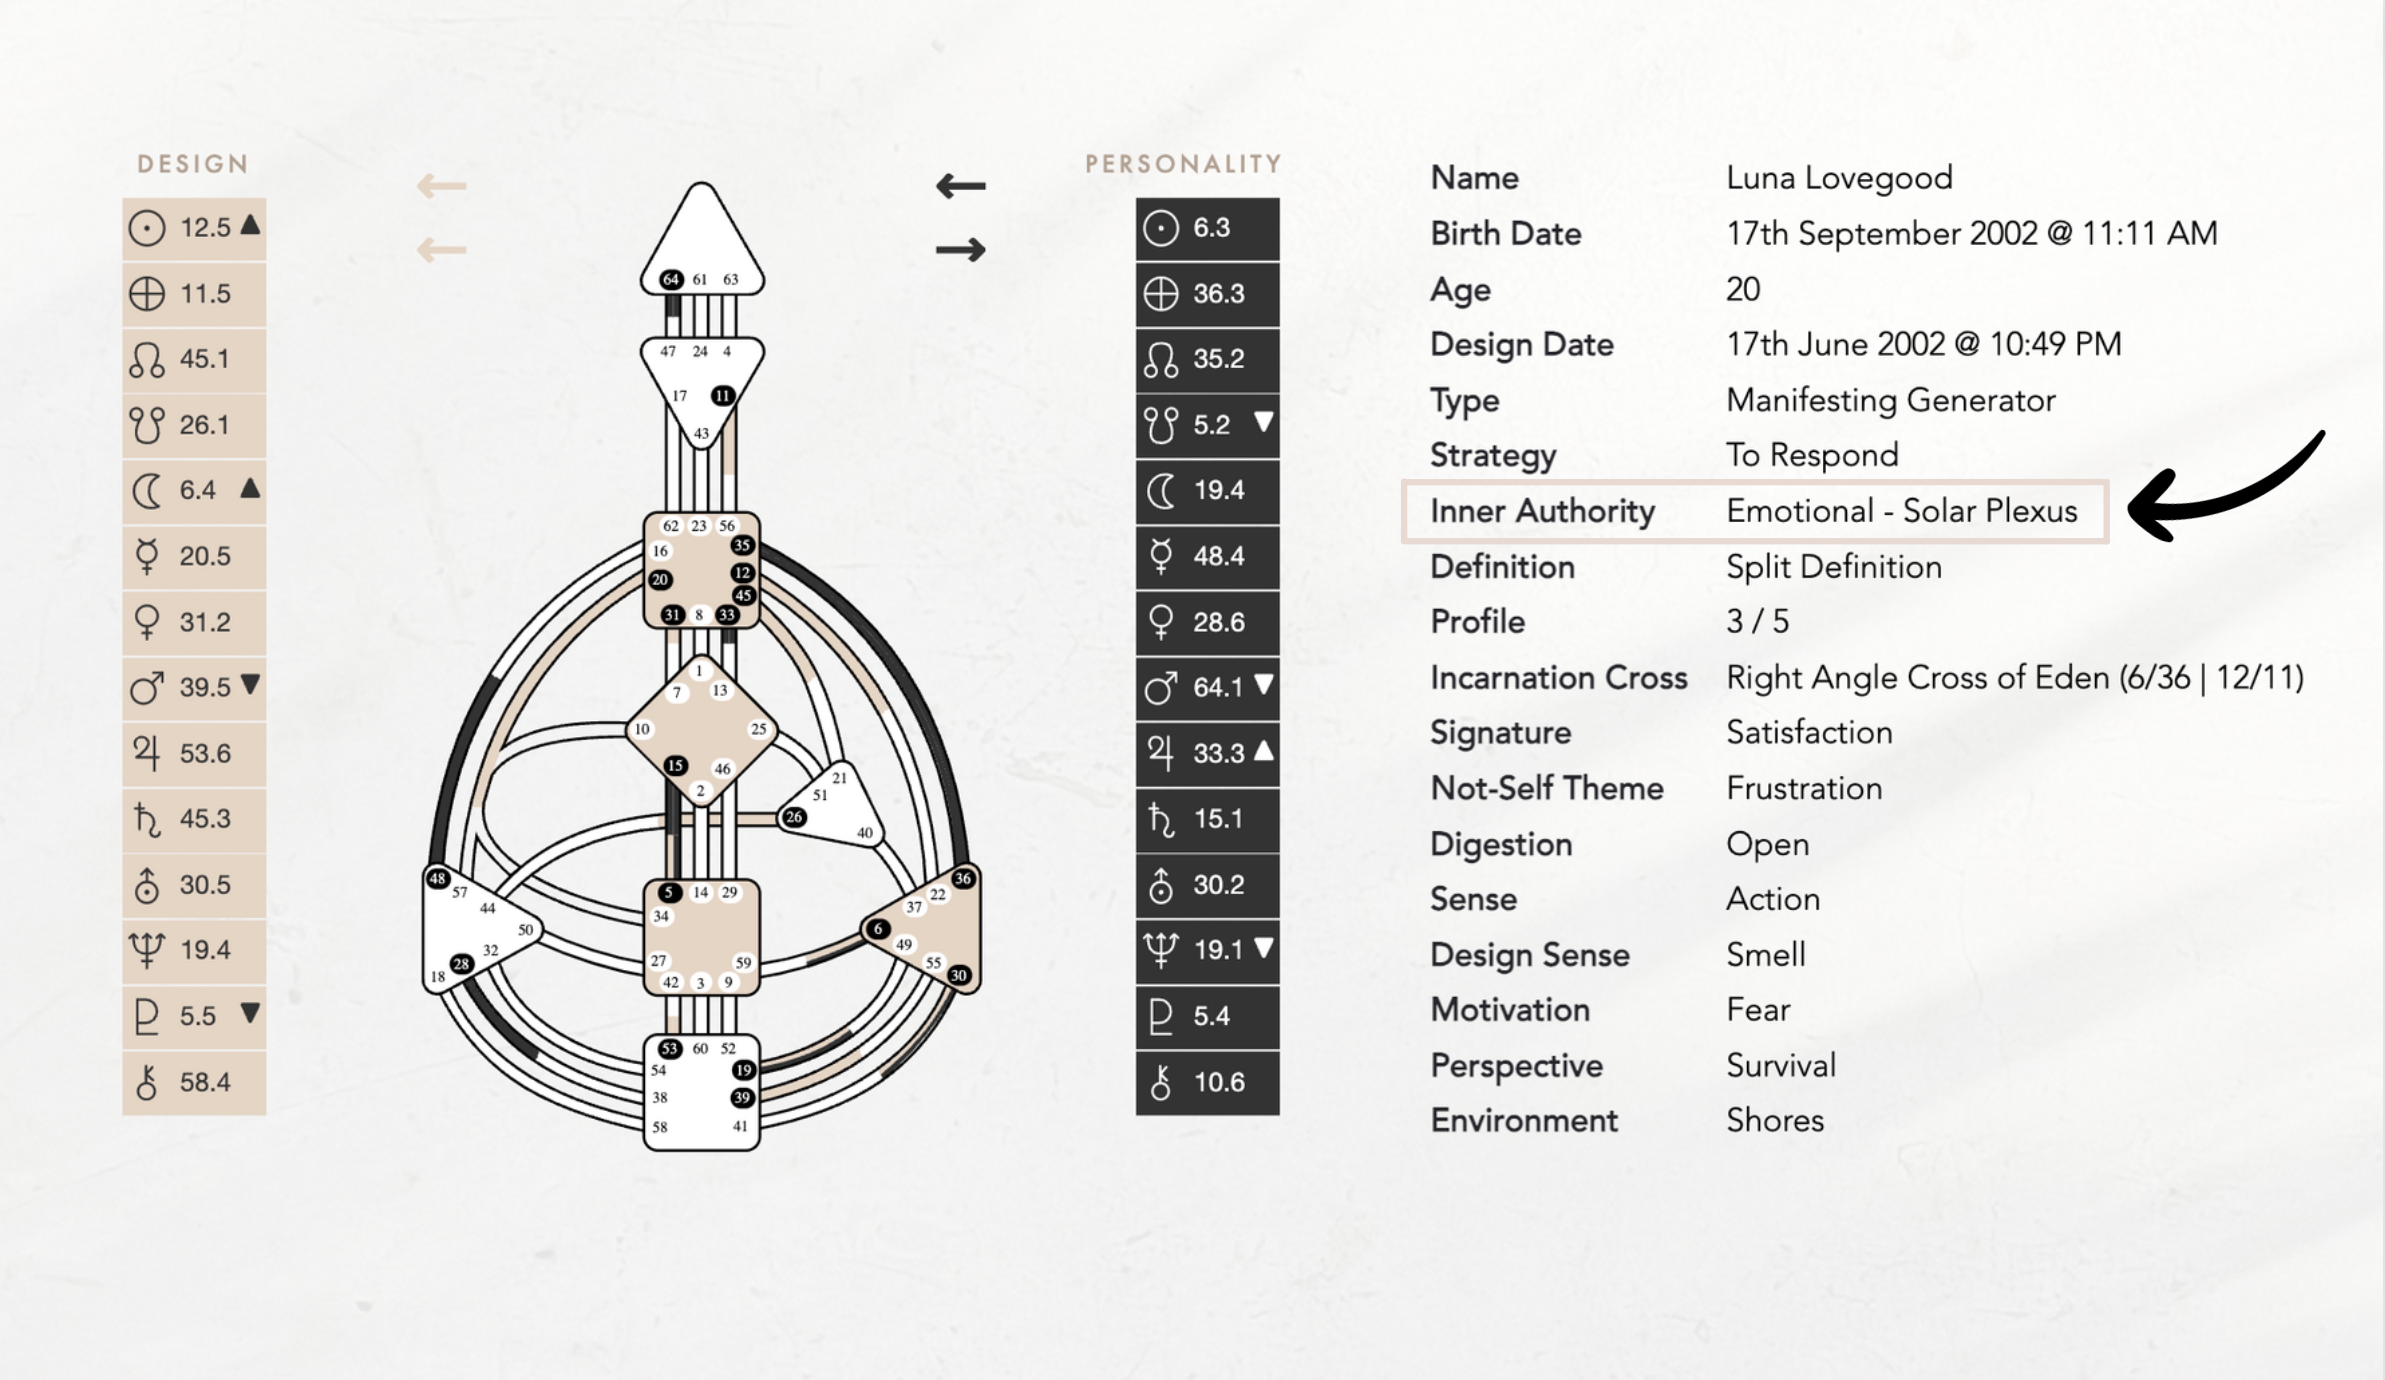
Here is a brief description of each:
Emotional Authority / Solar Plexus
For you, clarity comes with time. Before making a decision, you need to ride out the highs and lows of your emotional wave, feeling the full spectrum of your emotions, until you arrive at a place of clarity.
Sometimes you may need to wait 5 minutes, sometimes you may need to wait 5 weeks – the key is to give yourself space to process your emotions so you’re not making snap judgments during those intense highs or lows that may feel right in the moment but that don’t ultimately align with you in the long-run.
Sacral Authority
Trust your gut! For you clarity comes from the visceral gut response you experience when presented with a decision:
Is it a YES? – This might feel like expansive excitement in your body or an innate pull towards something.
Or is it a NO? – This might feel like a sense of contraction or heaviness in your body, or an innate pull away from something.
Sometimes, you may not feel strongly one way or the other. What does this mean?
The Sacral response truly embodies the saying, “If it’s not a hell yes, it’s a no.” There are no maybes here.
It’s important to know that the defined Sacral center acts in the now, responding to what you do or don’t have energy for in this moment.
If you respond with a maybe or a no, it’s not necessarily a no forever. It’s just an indicator that now isn’t the right time to commit your energy to this thing.
Splenic Authority
For you, intuition is everything! Like an animal sensing danger, you experience in-the-moment intuitive and physiological cues about what’s “safe” or “not safe” for you. This can feel like a quiet voice, a bodily sensation, or an inner knowing that can’t be explained to others.
It is said that the spleen only speaks once, quickly and softly. It operates on a moment-to-moment basis, so if you miss it – it’s gone!
For you, it’s deeply important to learn to be present and silence your mind so that you can hear what this inner voice is telling you.
With Splenic Authority, your intuition often becomes obvious in hindsight – when you’re looking back on those moments where you had a strange feeling about something and chose to write it off, only to later find out that you were right!
Pay attention to this and start recognizing how your intuition is speaking to you.
When you feel it, trust it, even if you can’t explain it or it doesn’t make “sense”.
Ego/Heart Authority
For you, it’s all about, well… YOU! With Ego Authority, you’re actually designed to be a little bit “selfish”.
Much like the Sacral Center communicates what you have energy for through a “yes/no” gut response, the Ego Center communicates what you have energy for through your desires.
So when making decision, trust that your desires were placed on your heart for a reason, without feeling guilty or the need to justify or rationalize them to others (or even yourself!).
By following what you want, value and truly desire for yourself, you’re able to make aligned decisions that you have the drive and commitment to see through.
Self-Projected Authority
Before making decisions, talk it out!
You find clarity and direction by verbally expressing your feelings, thoughts, and intentions without filtering yourself or overthinking.
You can speak out loud to yourself (try it, even if it feels silly!) or with a trusted confidant.
When sharing your thoughts with others, it’s important that they simply listen and provide a safe space for you to express yourself. This isn’t about receiving external advice or opinions, but rather hearing your own voice as a means to clarify your inner truth.
Environmental Authority
Like those with Self-Projected Authority, you find clarity through talking things out. HOWEVER, and this is key – you MUST be in an environment that makes you feel at ease and with people who make you feel seen, recognized and supported.
You don’t need advice or opinions. With your defined Ajna, it’s all about processing your thoughts aloud with trusted confidants who act as sounding boards, helping you articulate what you’re thinking and feeling so that you can find clarity.
Because of your sensitivity to your surroundings, having multiple conversations with different people in different environments to see how they “feel” can be helpful.
Lunar Authority
If you have Lunar Authority, you are designed to wait a full lunar cycle – approximately 28 days – before making any major decisions.
This gives you the opportunity to experience ALL of the different Authorities as you flow through the transiting energies, gaining insights from each one so that you can ultimately make the most well-informed and aligned choice for you.
Of course, this isn’t always practical or realistic!
As a Reflector, you’re constantly taking in and amplifying the energy around you, so spending time in different environments that allow you to sample many different energies and perspectives until you arrive at a deep inner knowing can be helpful.
Above all, give yourself the “grace and space” to take your time when making decisions and to move at your own pace.
Your Strategy and Authority go hand-in-hand in Human Design.
Together, they form a sort of “personal GPS system”, guiding you along the path of living out your highest potential in the most efficient, pleasurable and authentic way possible.
By following your Strategy and Authority, you can avoid those ‘wrong turn’ decisions and detours that might seem enticing in the moment, but ultimately lead you astray.
Yet, if (and when – it’s inevitable!) you DO veer off course, your Strategy and Authority will always “re-route” to guide you back into alignment.
You may be thinking, “Okay, it sounds simple – follow my Strategy and Authority – but like… I don’t even KNOW where I’m heading, so how the heck am I supposed to know if I’m on the right track?”
Fortunately, the Human Design System has an answer for that, as well.
Signature & Not Self Theme
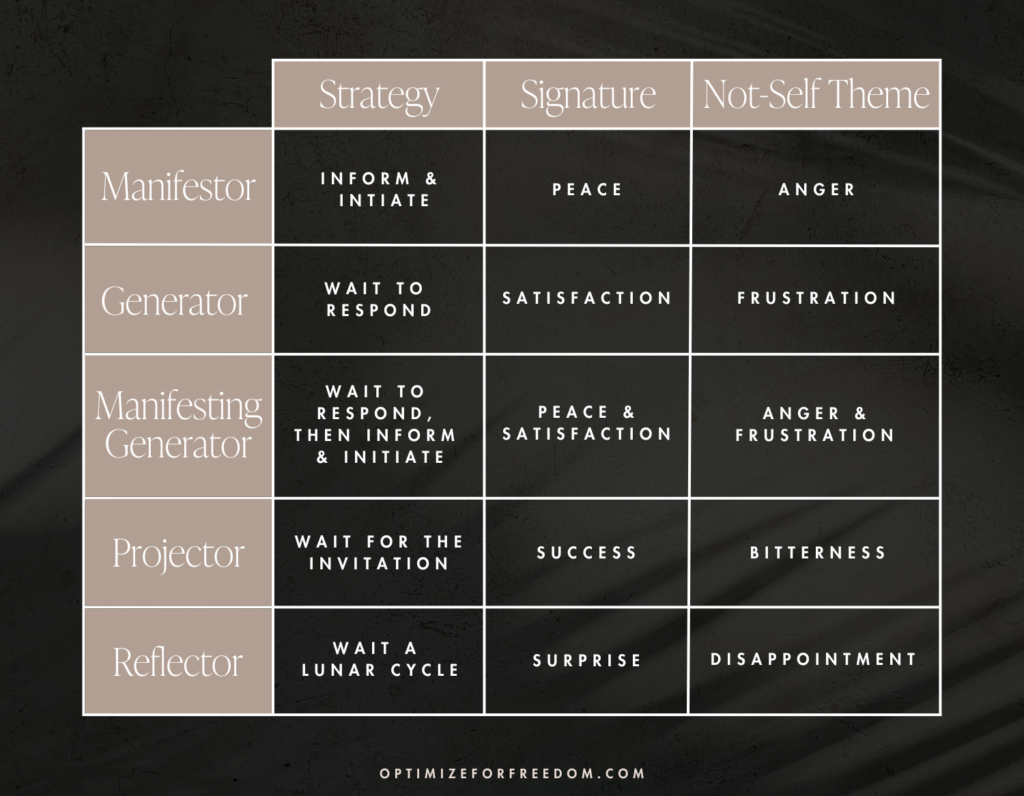
Each Strategy has a corresponding Signature and Not-Self Theme that serve as signals, guiding you toward alignment and alerting you when you stray.
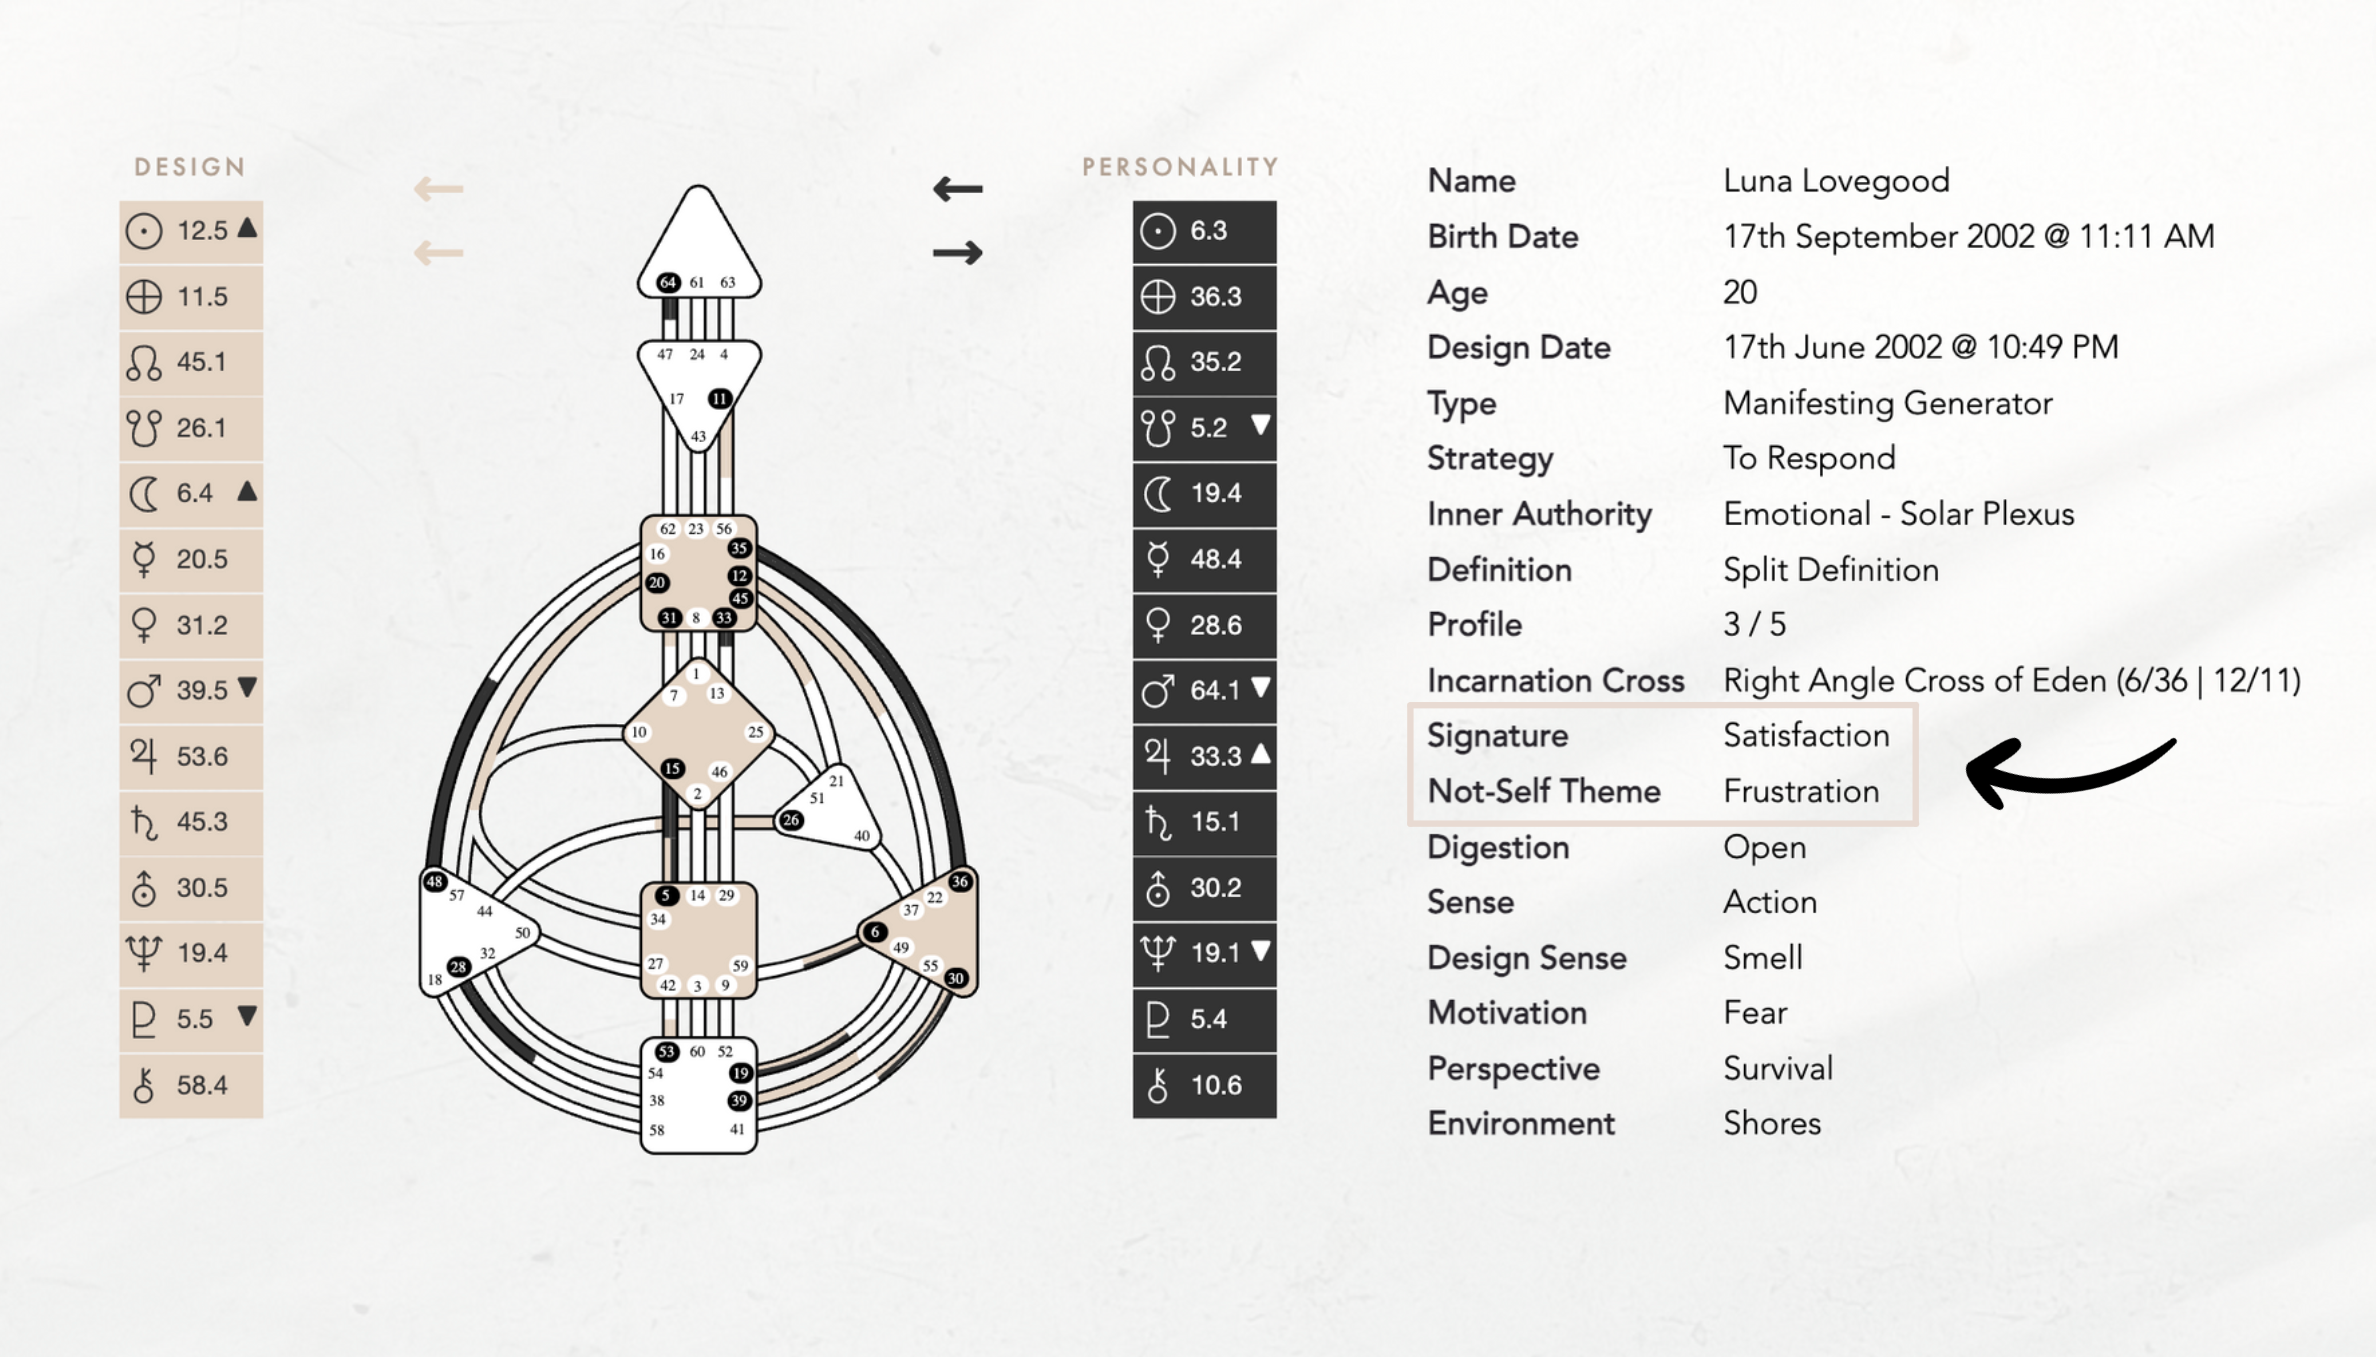
Signature
Your Signature is the feeling you experience when you’re on the right track, making correct decisions using your Strategy and Authority and living in alignment with your Design.
SIGNATURE BY TYPE:
- Manifestor – Peace
- Generator – Satisfaction
- Manifesting Generator – Satisfaction and/or Peace
- Projector – Success
- Reflector – Surprise or Wonder
Not-Self Theme
Your Not-Self Theme is the feeling you experience when you’re making choices that aren’t in alignment with you. Consider it a friendly warning sign nudging you to pause, reflect, and course-correct where necessary.
NOT-SELF THEME BY TYPE:
- Manifestor – Anger
- Generator – Frustration
- Manifesting Generator – Frustration and Anger
- Projector – Bitterness
- Reflector – Disappointment
Take a look at your Signature and Not-Self Theme:
- Do these feelings resonate with you?
- How and when do you personally experience your Signature and/or Not Self Theme?
- Are you experiencing more of your Signature or your Not-Self Theme on a regular basis?
- What’s one action you can take to bring more of your Signature feeling into your life today?
Profile
In Human Design, your Profile is like the character or role you play in the “movie” of life.
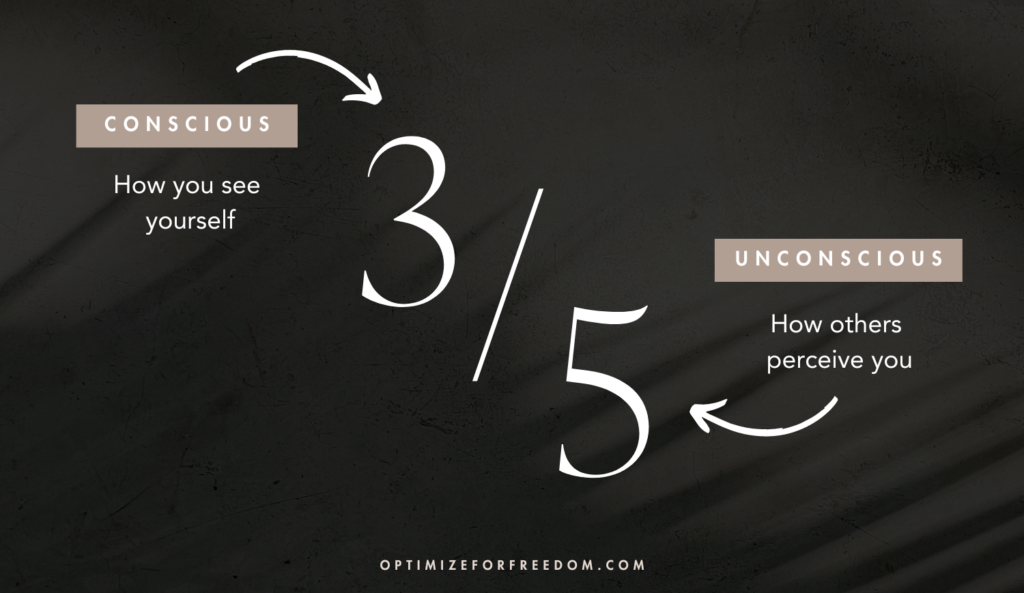
Your Profile is determined by a combination of two numbers (known as Lines), ranging from 1 to 6, which are taken from your conscious and unconscious Sun positions.
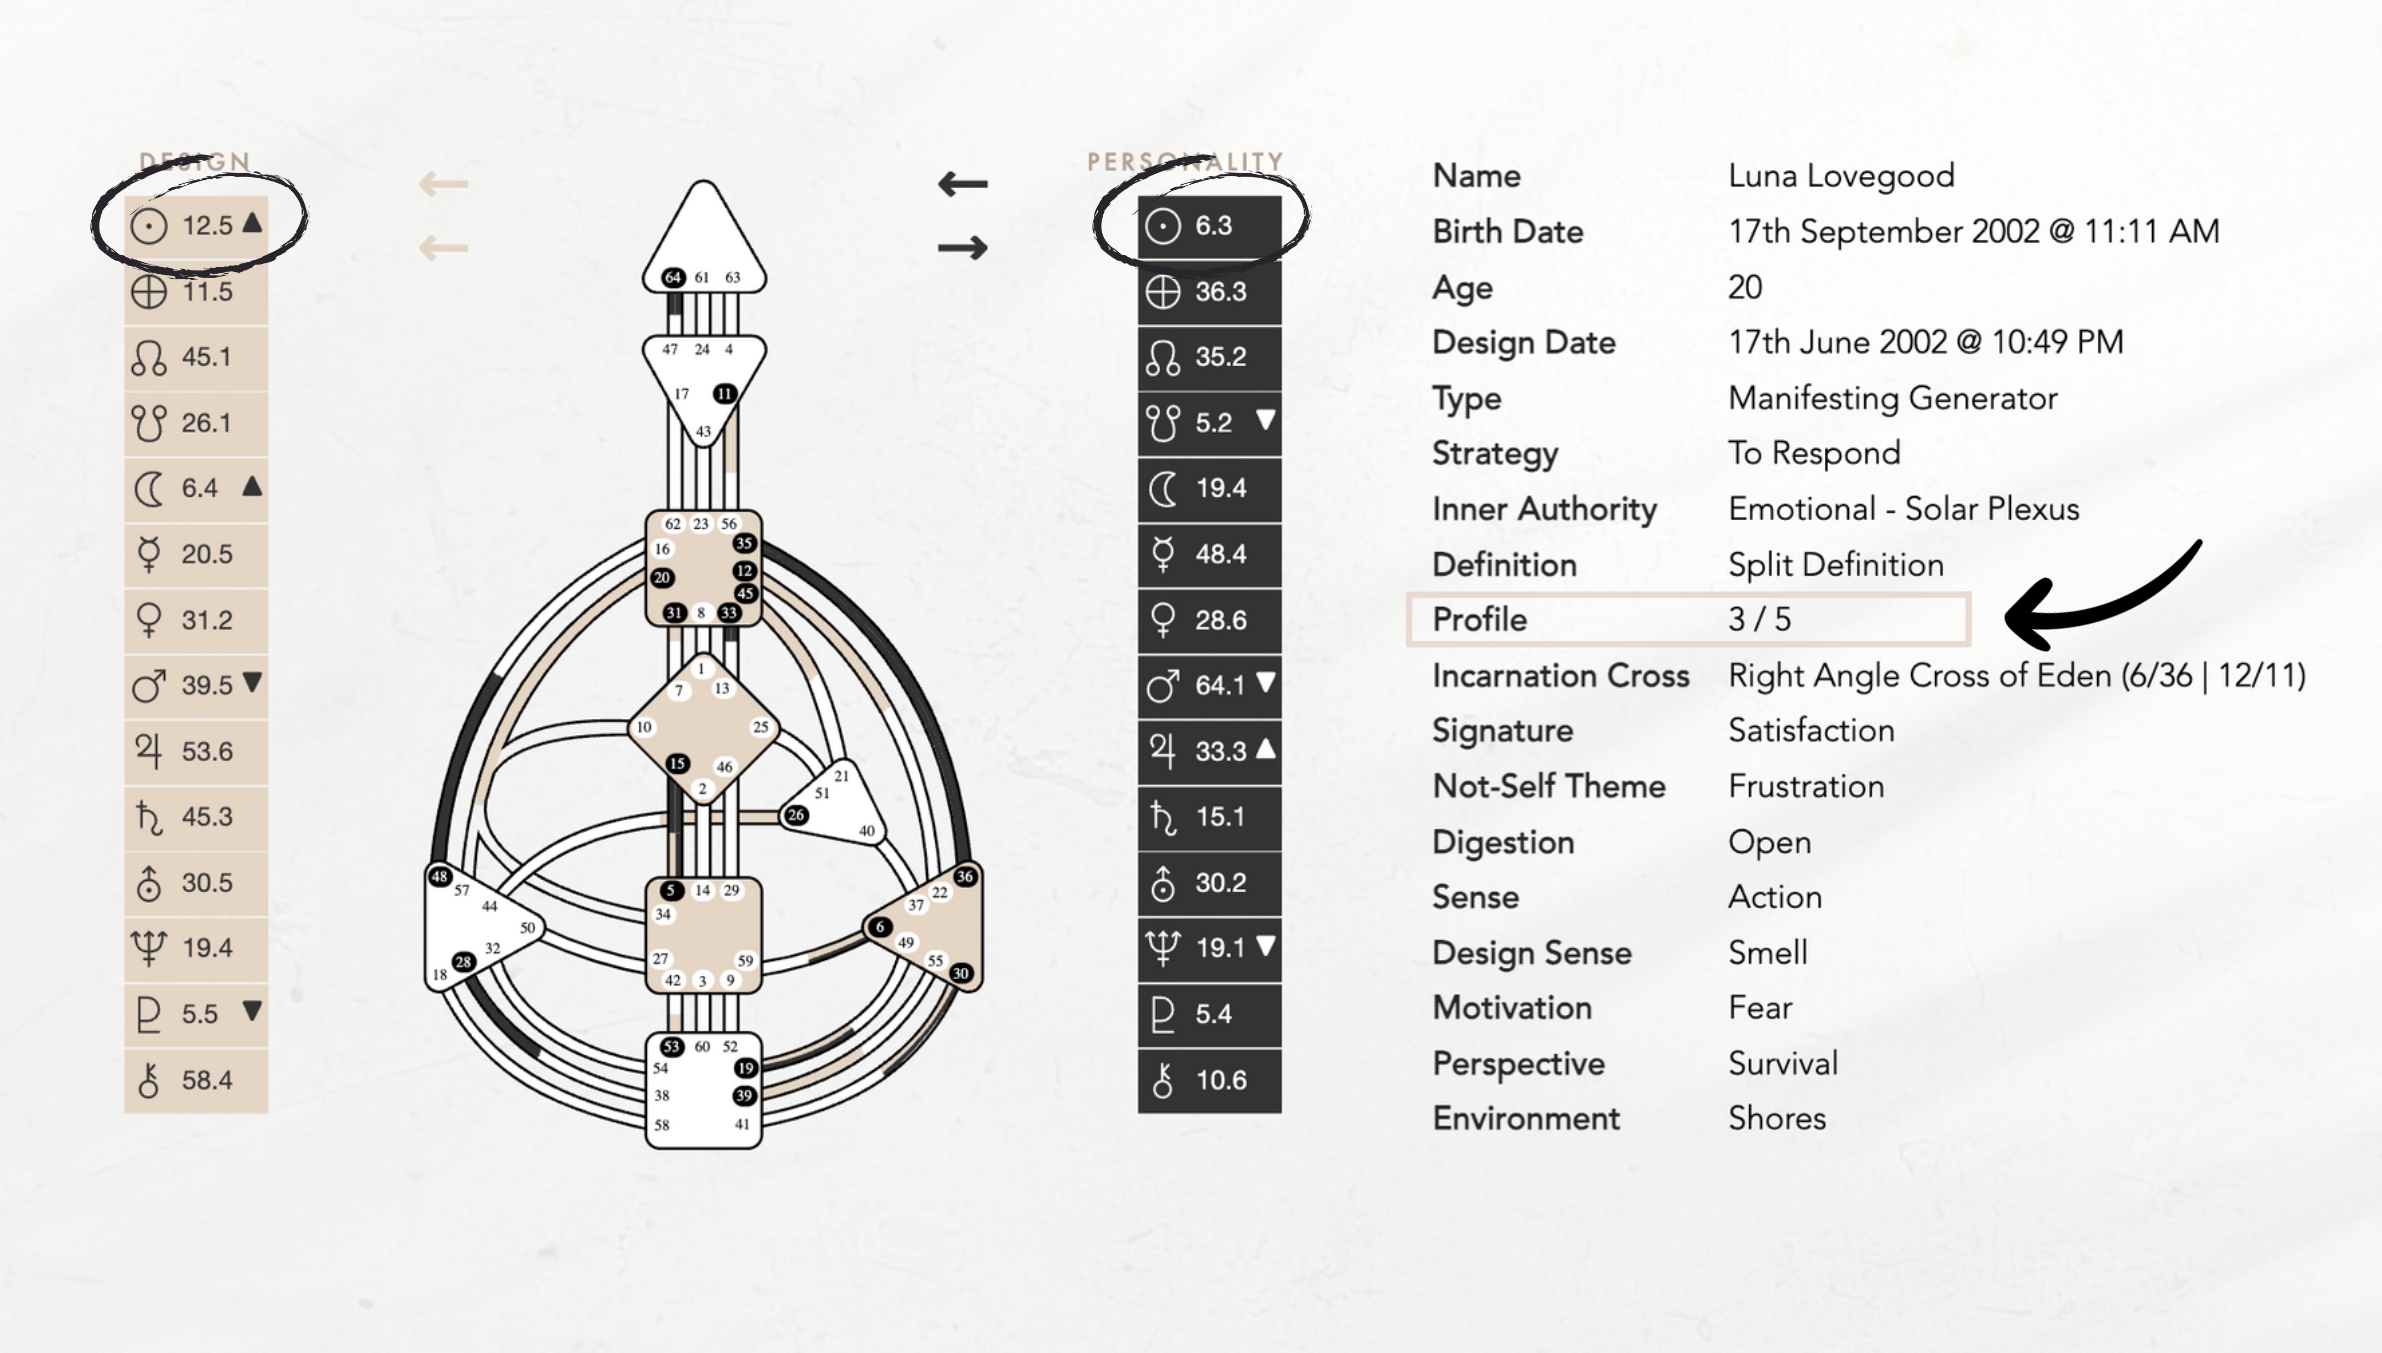
Your Profile is written in a fraction format (3/5, 1/4, 6/2 etc.), and each number corresponds to a particular role or archetype.
The first number of your profile is your ‘conscious’ or ‘personality’ role – this is the role you’re more aware of and may more readily identify with.
The second number is your ‘unconscious’ role. This is often less apparent to you but still significantly shapes your life journey and how others perceive you.
Here’s a brief description of each Line:
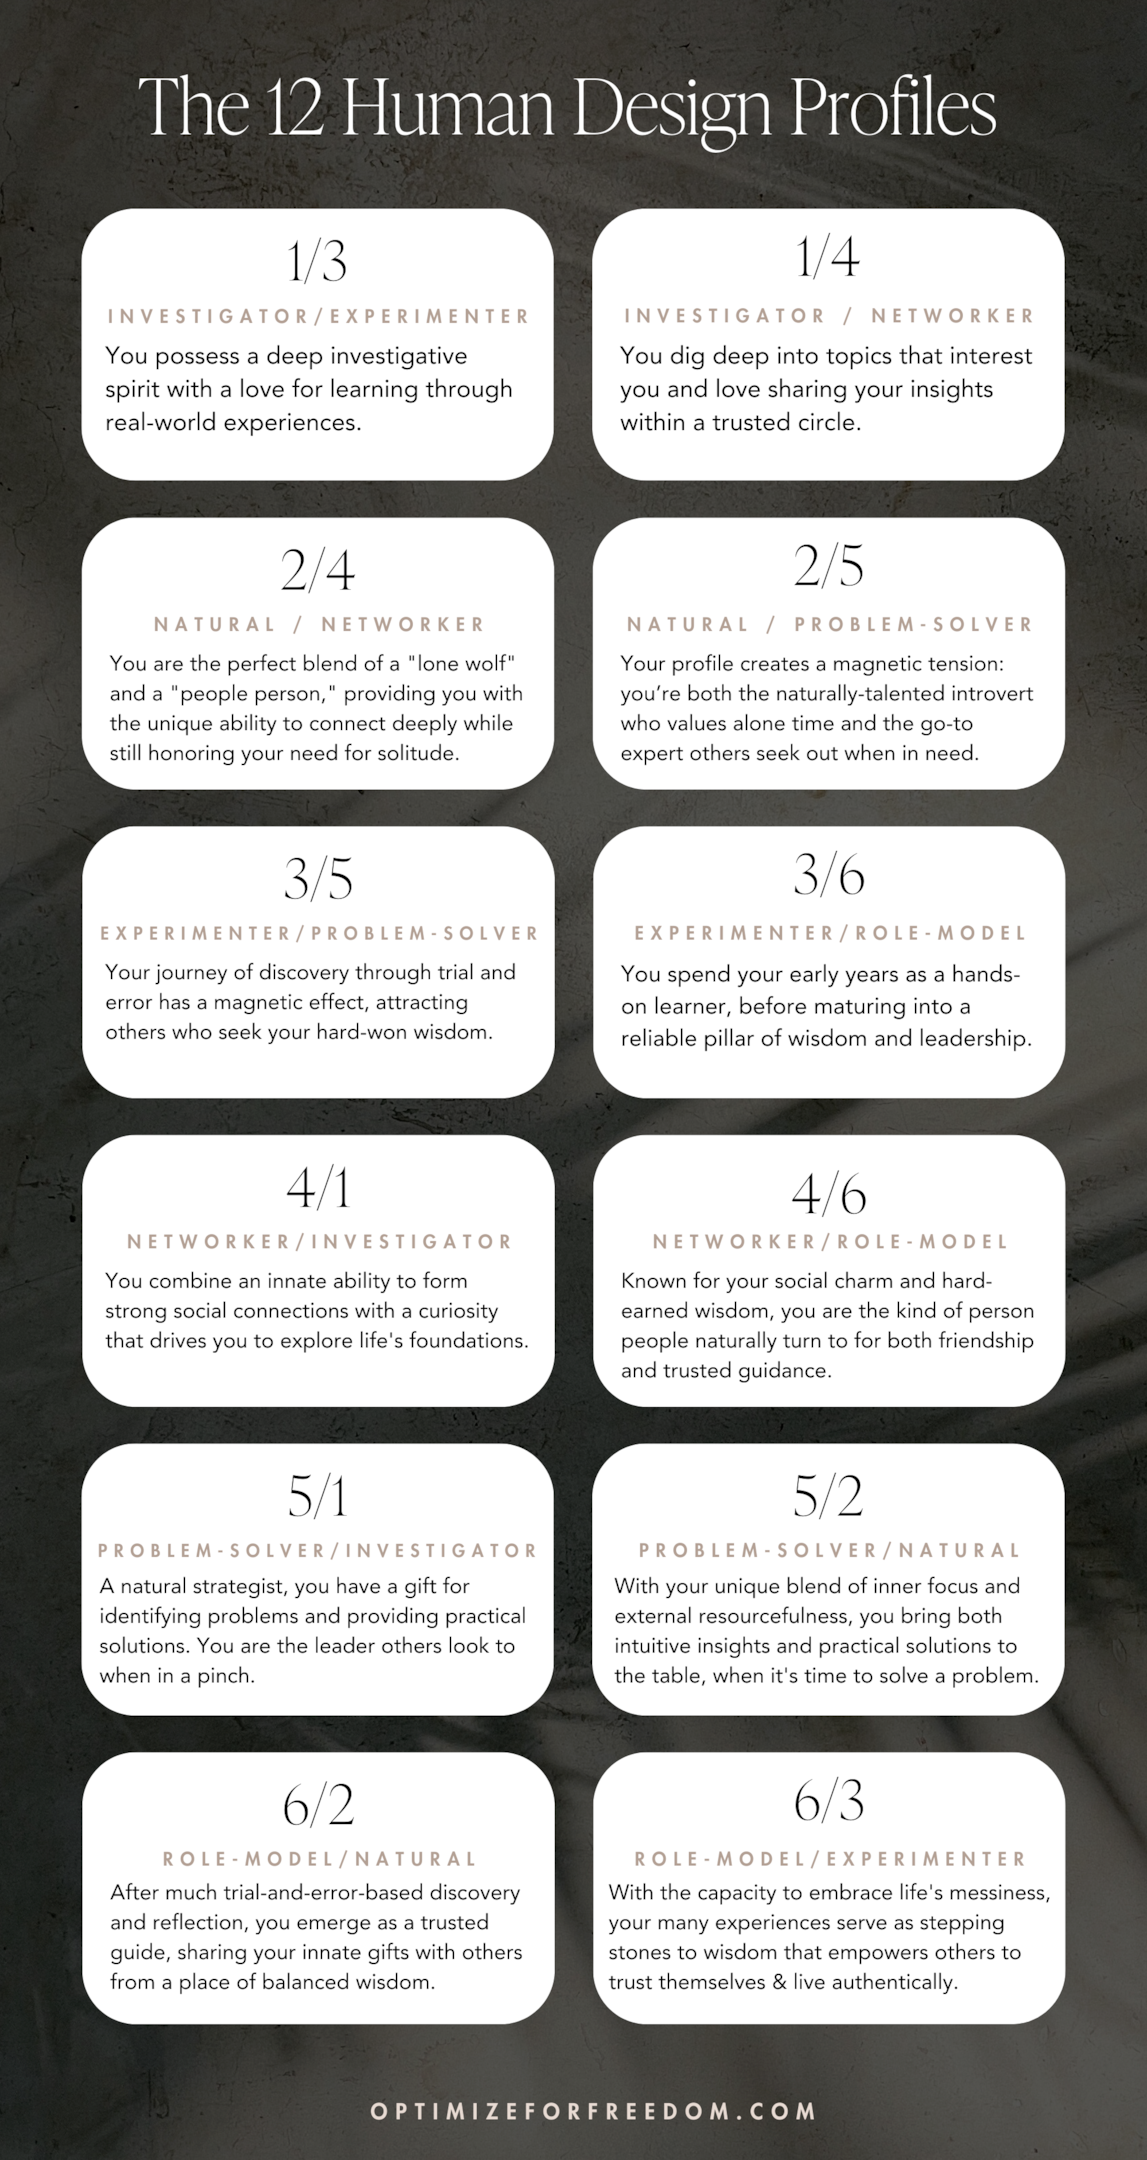
Line 1: The Investigator
Naturally curious and detail-oriented, you thrive when immersing yourself in topics of interest until you gain a comprehensive understanding. You need to be well-informed and have full access to information in order to feel secure and confident when making decisions.
Line 2: The Hermit / Natural
Unlike the Line 1 who develops mastery over time through knowledge-seeking, you possess a gift or skill that comes so naturally to you, you may not even recognize it as a “talent”. While you are likely quite happy to be left alone to do your own thing, others who recognize your natural talent(s) will call you out to share your gifts with the world.
Line 3: The Martyr / Experimenter
For you, life is an experiment. You learn best from hands-on experience, often plunging into situations head-first and engaging in a continuous cycle of trial and error as you discover what works and what doesn’t. Your resilience and adaptability allow you to navigate the world with a learner’s heart, turning challenges into valuable insights that can be shared with others.
Line 4: The Opportunist / Networker
You possess a gift for building and maintaining meaningful connections. With a charisma that draws people in, your presence radiates influence in your social circle, making you a magnet for opportunities and shared experiences that come from within your network.
Line 5: The Heretic / Problem-Solver
As a natural problem solver, others look to you for guidance and clarity. You may frequently find yourself in situations where you’re called upon to lead, advise, or share your knowledge, illuminating pathways that others might not see. With a presence that captivates and educates, you serve as a bridge between challenges and solutions.
Line 6: The Role Model
You are unique in that you experience life in three distinct phases: For your first 30 years, you live as a Line 3, gaining wisdom through experiential learning and trial-and-error. Between ages 30 to 50, you enter into an introspective period of personal growth where you reflect, process, and integrate everything you’ve learned from your many experiences. After age 50, you enter into the final phase where you begin to live what you’ve learned and “walk your talk”, serving as a source of wisdom and a role model for others.
Putting It All Together: Your Profile Meaning
Your Human Design Profile represents a dynamic interplay, with the two Lines working together in a dance of push and pull to influence how you show up and move through life as well as how you’re here to influence others and contribute.
Example
Let’s consider a 1/3 profile – a blend of the Investigator and the Martyr/Experimenter.
The ‘Investigator’ seeks depth, wanting to understand everything down to its roots. This person needs the time and space to go down the rabbit hole with their research in order to feel secure in their decisions.
On the other hand, the ‘Martyr/Experimenter’ learns through hands-on experiences, embracing a “learning by doing” cycle of trial and error.
This means that while one part of this person is diligently seeking knowledge and understanding, the other part isn’t afraid to dive in, try things out, and make mistakes to learn.
Together, this profile is characterized by a person who deeply researches and gathers information, but is also unafraid to get their hands dirty and learn from real-world experiences.
Yet, this combination can also introduce internal tension: the Investigator’s urge for certainty and depth might occasionally conflict with the Experimenter’s impulse to leap into action.
This person may often find themselves in a tug-of-war, balancing their desire for detailed research with their equally strong inclination to just “give it a go” and learn on the fly.
Take a look at the descriptions for the two numbers that make up your Profile:
- As you reflect on your own experiences, do you see instances of these two roles guiding your actions and decisions?
- How do these descriptions resonate with the way you view yourself or the roles you naturally take on?
- Can you pinpoint moments where these archetypes have shone through, or even clashed?
Centers
Now on to one of my favorite parts of the Human Design System!
When you look at your BodyGraph, you’ll notice nine distinct shapes known as Centers.
Inspired by the Hindu chakra system, your Centers are the key to understanding how your energy circulates.
Each Center is associated with a distinct theme. There are so many juicy details we could get into here (and we will in a future post) but for now, here’s a brief overview of each:
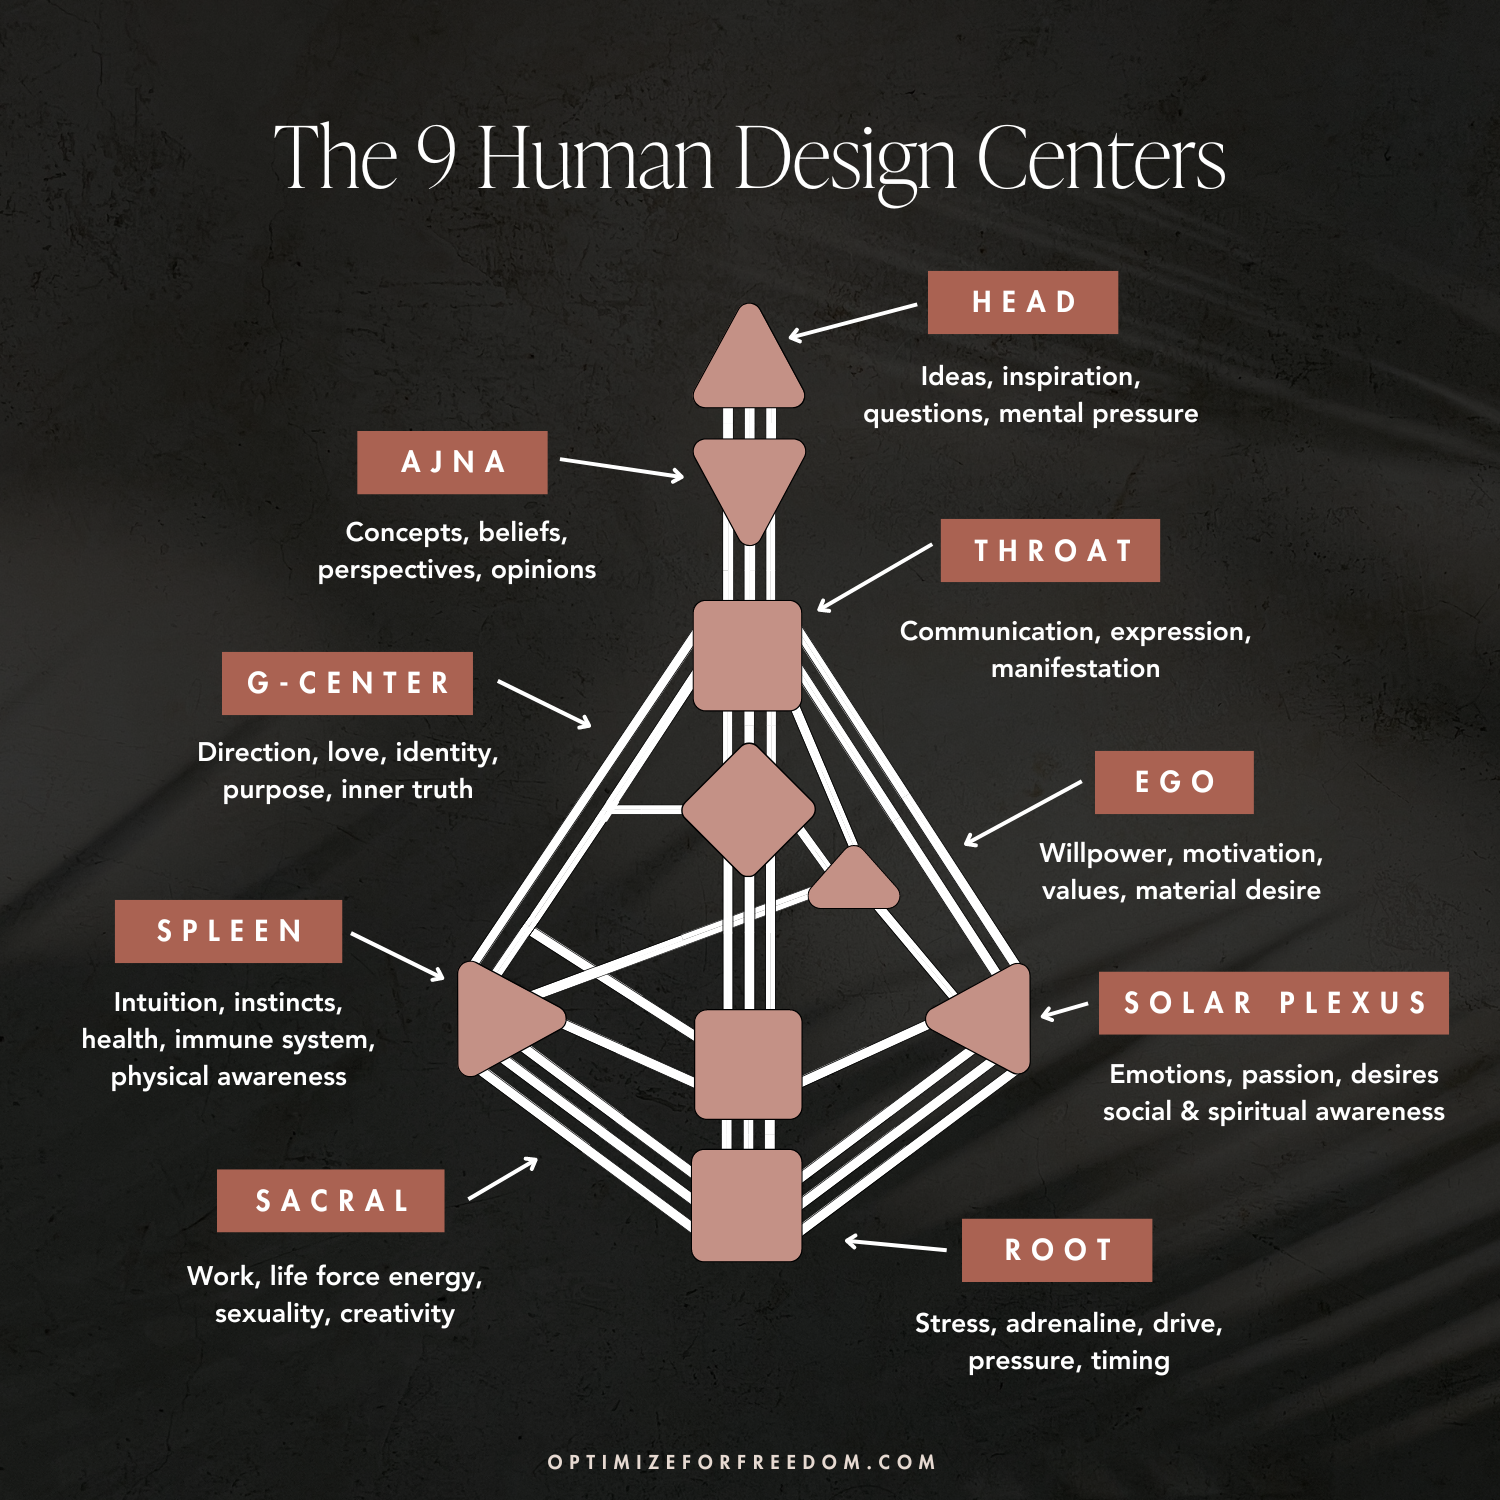
Head Center
(Ideas, inspiration, questions, mental pressure)
This is where the energy for inspiration, ideas, and curiosity resides. There can also be a pressure here to have all the answers or to “figure it out”.
Ajna Center
(Concepts, beliefs, perspectives, opinions, mental awareness)
This Center is where you process thoughts, ideas and inspiration to form your unique perspective and opinions.
Throat Center
(Communication, expression, manifestation)
This Center is all about expression. It serves as the bridge through which our inner world – our ideas, emotions and perspectives – manifest in the external world as words, actions and creations.
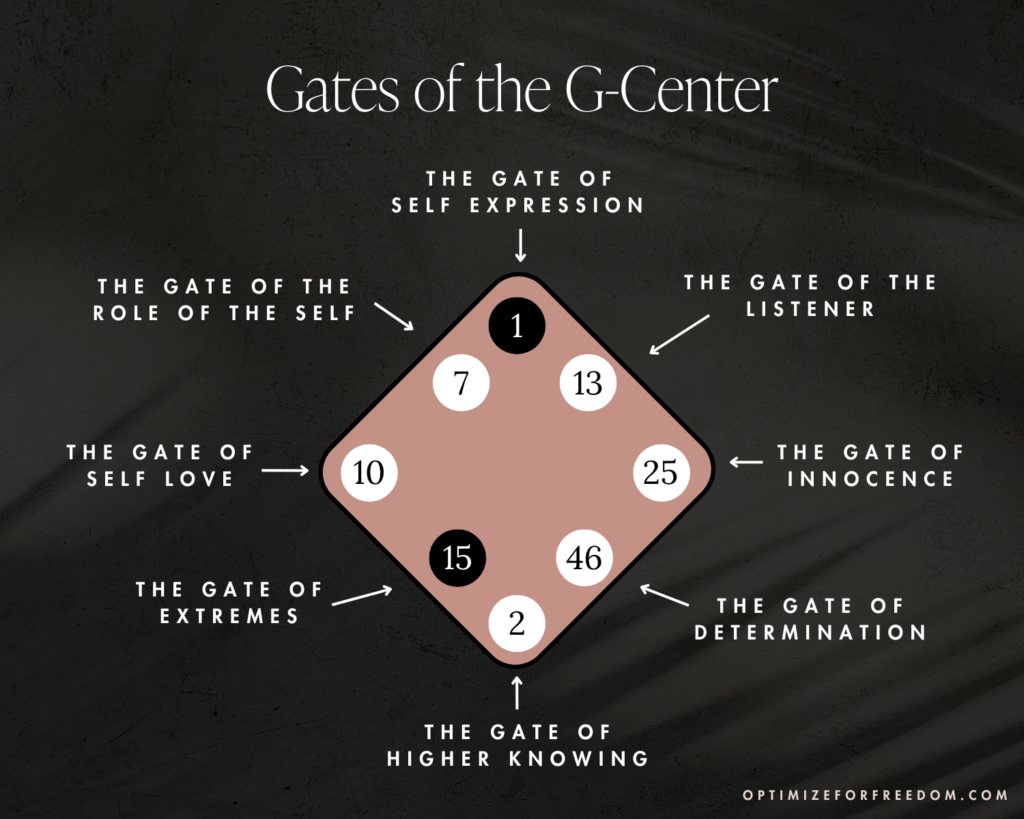
Identity/G Center
(Direction, love, identity, purpose, inner truth)
This Center represents the core essence of who you are. It holds your sense of identity, love, and personal direction, pointing you towards your authentic path.
Heart Center
(Willpower, motivation, values, material desire)
The Heart Center houses willpower, ego, and values. Here, we find the drive and determination to work to generate resources (aka cash money 🤑) and fulfill our material desires.
Sacral Center
(Work, life force energy, sexuality, creativity)
The Sacral Center is a powerhouse that provides a steady, renewable supply of energy when you respond to what excites you and are engaged in things you’re passionate about. Whether giving birth to ideas, art, or new life, this Center holds the profound energy of creation and innovation.
Root Center
(Stress, adrenaline, drive, pressure, timing)
While often viewed negatively, adrenaline and stress are primal forces that drive our personal evolution and growth. The Root Center ignites the fire of initiative within you to ensure you’re always moving, shifting, and growing.
Solar Plexus Center
(Emotion, passion, desire, social & spiritual awareness)
This is where we find the energy that makes us human – It’s home to emotion, passion, spirituality, sensitivity, seduction, intimacy, creativity, revolution, and so much more. The Solar Plexus Center is about experiencing the depths of our emotions in order to strengthen our connection to ourselves, to spirit and to each other.
Splenic Center
(Intuition, instincts, health, immune system, physical awareness)
The Splenic Center represents intuition, instinct, and physical wellbeing. Acting as your body’s ancient alarm system, it provides spontaneous, in-the-moment insights to guide you to healthy decisions.
Defined vs. Undefined Centers: What’s the Difference?
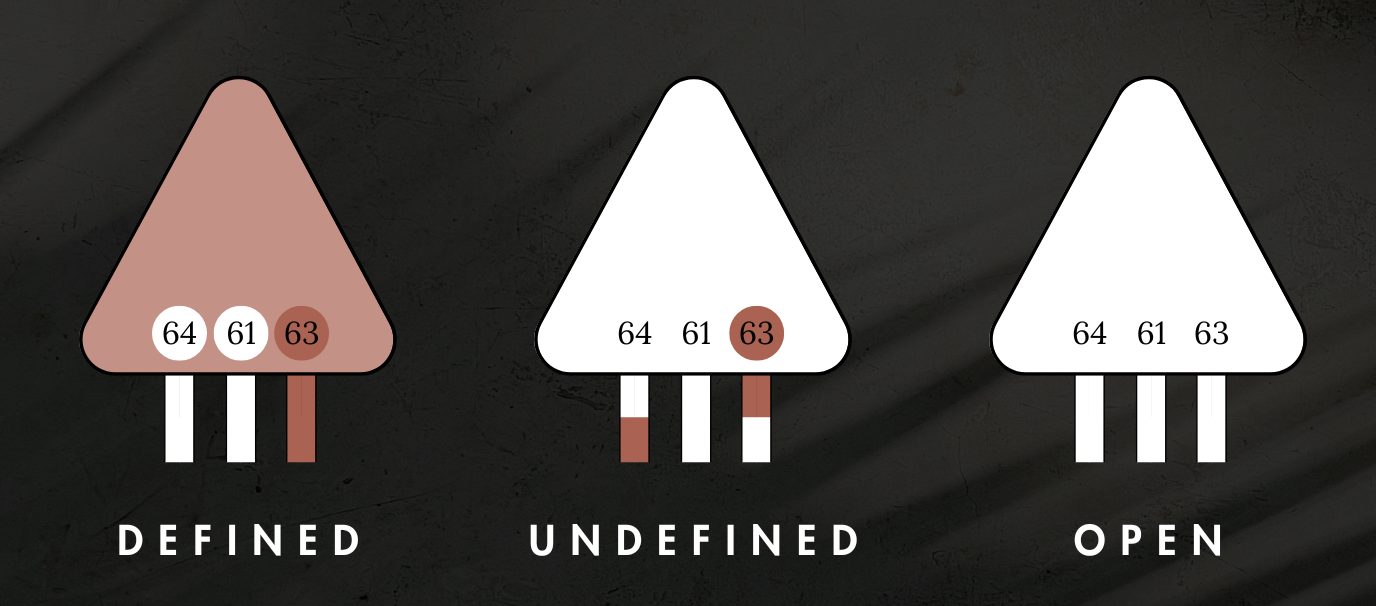
Each Center in the Human Design BodyGraph will either be colored (defined) or a white center (undefined or open).
Depending on the generator used to create your personal chart, the Centers may be many different colors. These colors are not significant – all that matters is if the center is colored or white.
Defined Centers (colored) represent areas where you have a fixed and reliable way of processing energy, regardless of the environment or people around you.
Undefined Centers and Open Centers (white) are areas where you are more flexible and adaptable, taking in and amplifying the energy of others, making you more susceptible to external influences.
EXAMPLE
To illustrate, let’s use the G Center, the center of love and direction:
When it’s defined (colored in on your chart), you have a consistent sense of who you are and where you’re headed. You may feel sure of your identity and path.
But with an undefined G Center, there’s more fluidity – You’re constantly exploring, adapting, and morphing, “trying on” different versions of yourself. Your journey is about discovery, not sticking to a set path or identity.
Understanding the Centers and their impact is one of the most GAME-CHANGING aspects of Human Design.
I can’t wait to dig into the details later in the series!
For now, take note of which of your energy Centers are defined and which are undefined. Then, look at the themes for each energy Center shared above.
- How do you notice the consistent influence of your defined Centers in your life?
- Now look at your undefined and open Centers – Can you recall moments when you felt especially influenced by others or your environment in these areas?
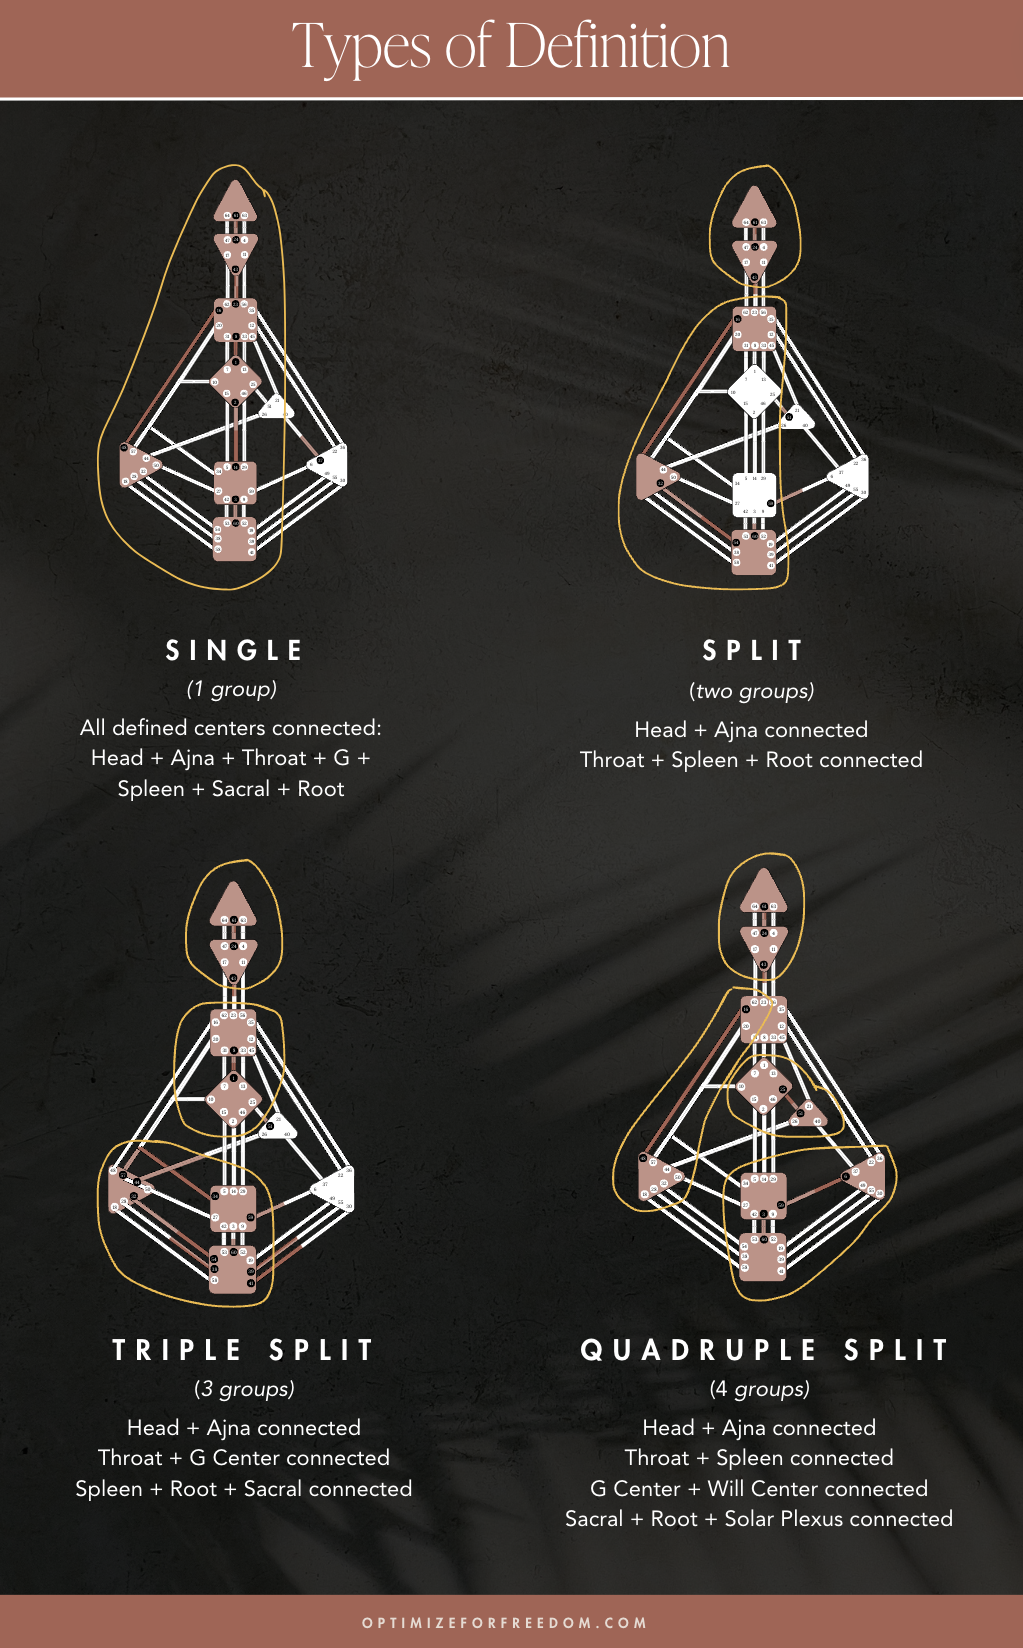
Definition
Now, let’s talk about something equally crucial but often overlooked: your Definition. Your Definition is determined by how your energy Centers connect with each other.
There are four main types of Definition:
Single Definition
If all of your Defined Centers are interconnected, you have a Single Definition. You may find it easy to make decisions independently, and you don’t necessarily need a lot of input from others to feel secure in your choices.
Split Definition
If your Defined Centers are divided into two or more separate areas that aren’t connected, you have a Split Definition. This often points to a need for interaction and engagement with others to feel complete or make decisions.
Triple Split Definition
If you have three separate groups of defined centers, you’re a Triple Split. You might find that you operate best when you have access to multiple perspectives in your life.
Quadruple Split Definition
With four separate areas of definition, individuals with Quadruple Split might experience themselves as very multifaceted and may require different environments or relationships to feel fully expressed.
Your Definition provides an added layer of nuance to your Human Design, offering clues into how you operate energetically in the world.
For instance, if you’re a Single Definition, you may thrive in jobs or situations where you’re given a lot of autonomy.
On the flip side, if you’re a Split Definition, collaborative environments could be where you shine.
Grasping this concept will help you better understand not only yourself, but also how you relate to others.
Gates
Within each Center, you will see several different numbers ranging from 1 to 64. These are known as Gates.
You’ll notice that some of the Gates are colored in. These are called your defined or “active” Gates.
You can think of your active Gates as the building blocks of your personality, providing insight into your unique characteristics, strengths and potential challenges.
Gates that aren’t colored in on your chart are referred to as “open” Gates.
They represent inconsistent or flexible aspects of your personality that may fluctuate based on external circumstances such as who’s around, planetary transits, and your physical environment.
On their own, the Gates are fascinating (we’ll be breaking down the themes of all 64 in a future post in this series) but the insights they provide become even more powerful when you understand the additional context provided by the planets.
Planets
Remember those boxes flanking the BodyGraph that we talked about at the beginning? Each of your defined (colored) Gates is represented here.

If a Gate appears in the dark column, it represents aspects of your conscious personality.
If a Gate appears in the light column, it’s part of your unconscious “design”, and while it’s still a consistent part of who you are, it may not be as recognizable to you.
The same Gate can appear in both of the columns. It can also appear multiple times within the same column.
You’ll notice that there is a symbol next to each Gate number in the columns.
Each of these symbols represents a planet and provides information about how the energy of this specific Gate may show up in your life.
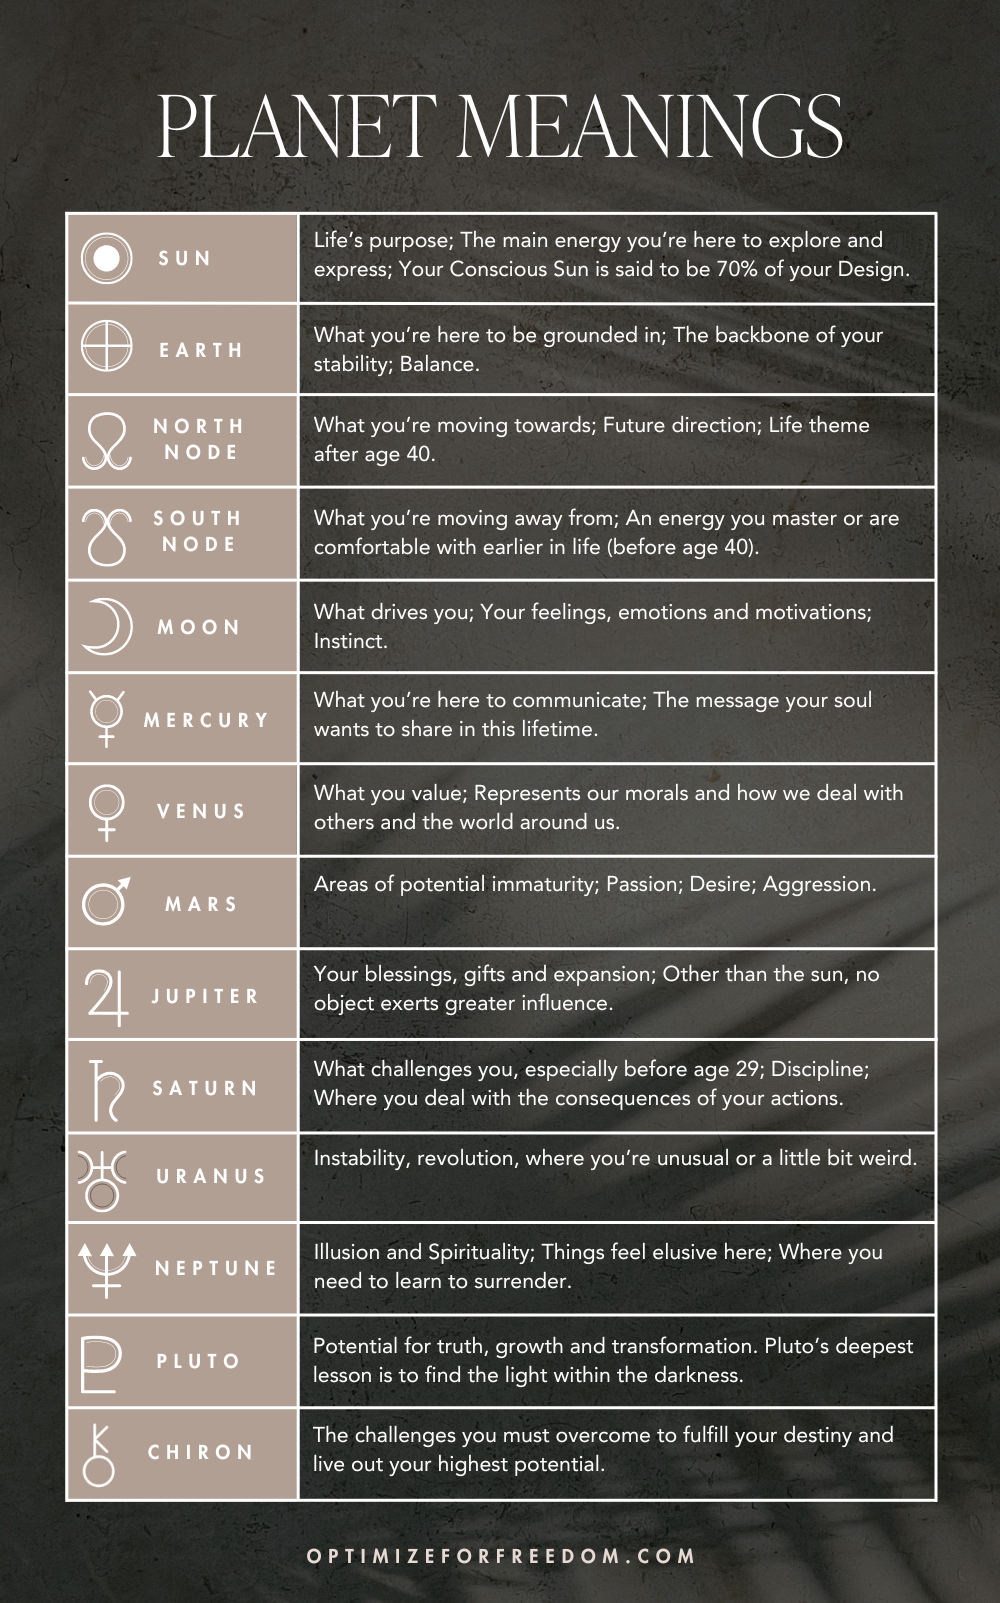
For instance, the Sun represents your life force energy and what you’re here to share with the world, while Venus reveals insights into your relationships and values.
So two people can have the exact same gate(s) active and yet, depending on their planetary placements, experience the energy in completely different ways.
This is part of what makes Human Design so fascinating!
Now that we’ve touched on Gates and Planets, it’s time to turn our attention to the Channels.
Channels & Circuitry
See the lines in your BodyGraph chart connecting the Centers? They’re called Channels.
Your energy isn’t stagnant. It’s always in motion. Channels are the pathways that consistently MOVE your energy through the BodyGraph from one Center to another.
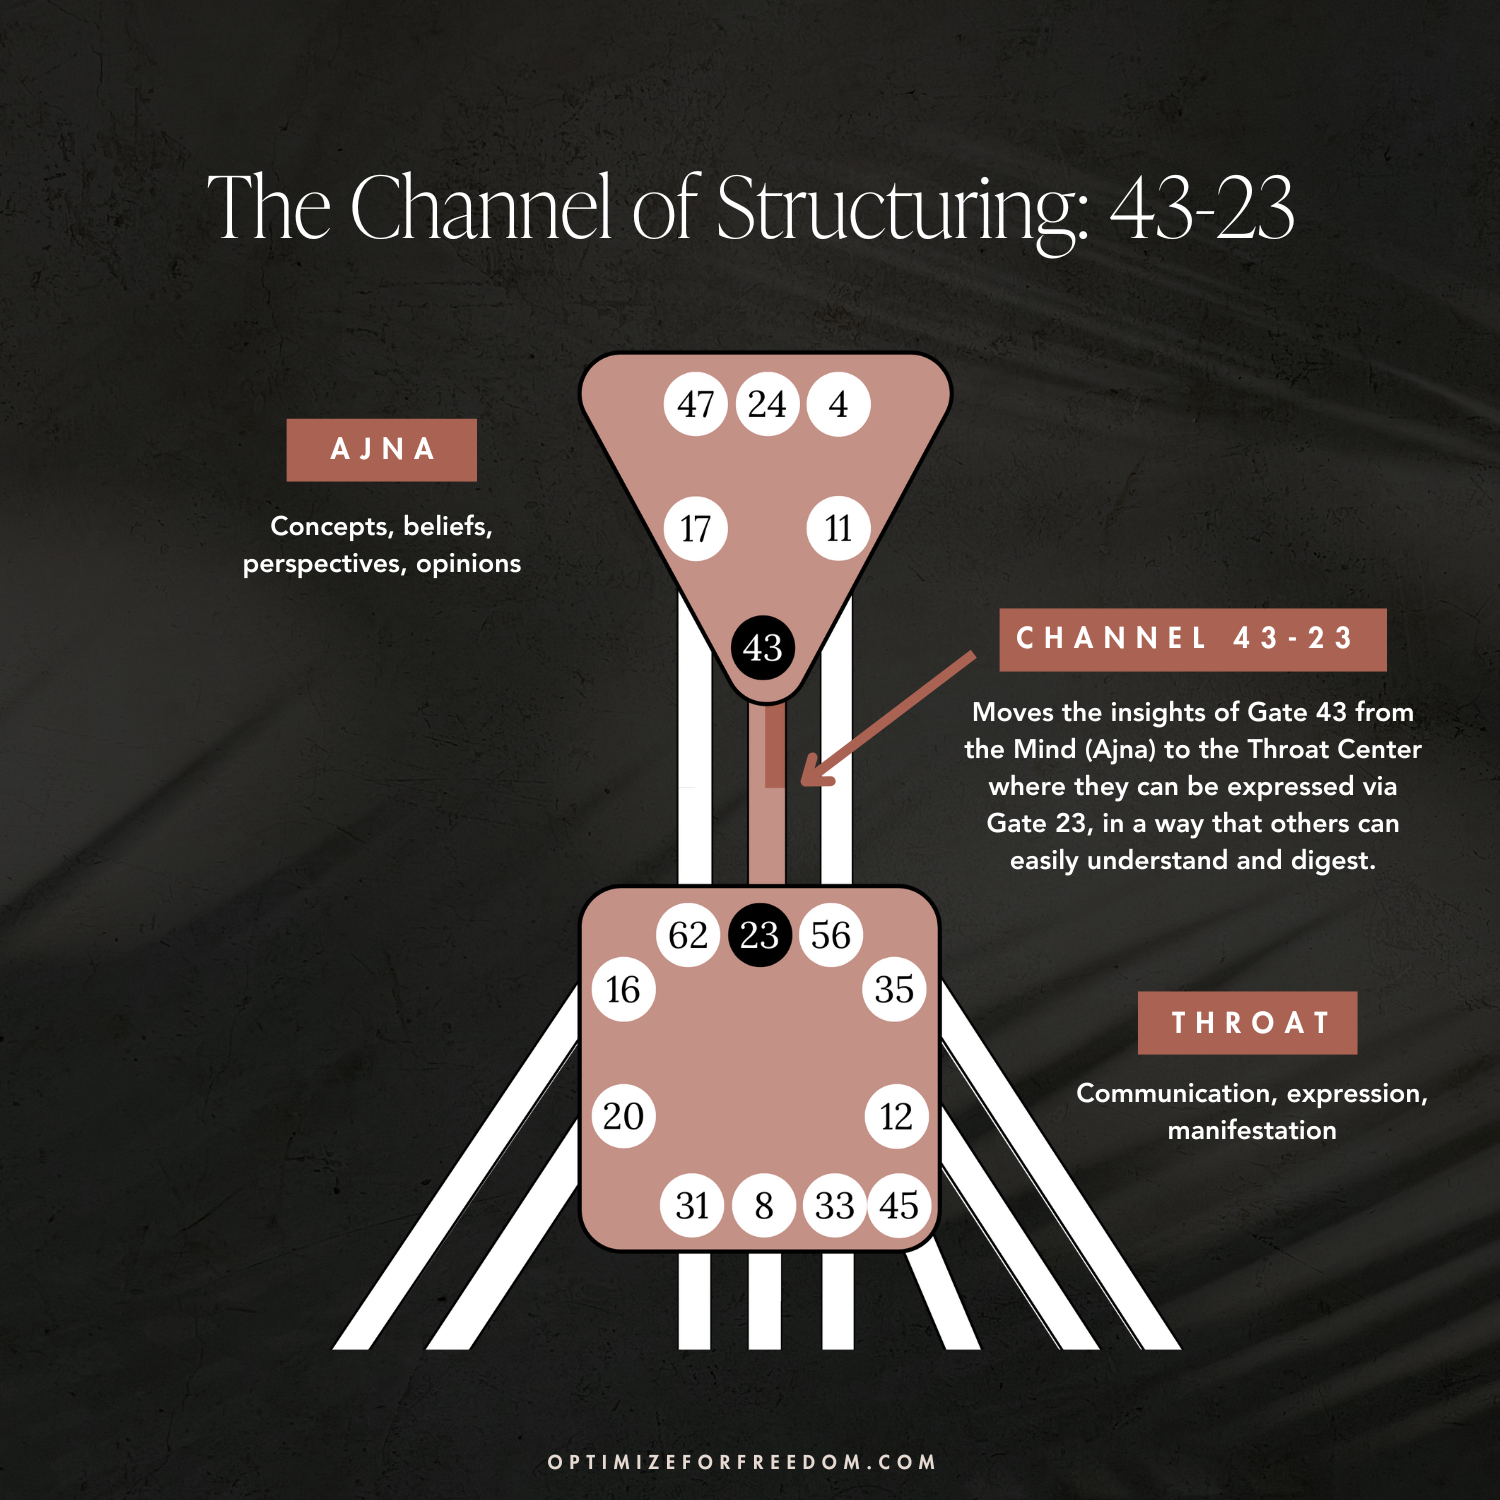
For example, I have the Channel 43-23 (also known as the “Channel of Structuring” or the “Genius to Freak” channel) defined. This channel has a theme of taking complex topics and explaining them in a simple, digestible way.
Gate 43 resides in the Ajna Center where our perspective is formed. It’s all about receiving new, transformational insights that are often ahead of their time and therefore can be difficult for others to accept and understand.
Gate 23 is located in the Throat Center, the center for expression and manifestation. It’s all about having the ability to explain novel, innovative concepts in a simple, digestible way.
Gate 43 is connected to Gate 23 via the Channel of Structuring. This channel moves the perspective and insights of the Ajna to the Throat Center where they can be expressed to others.
Make sense?
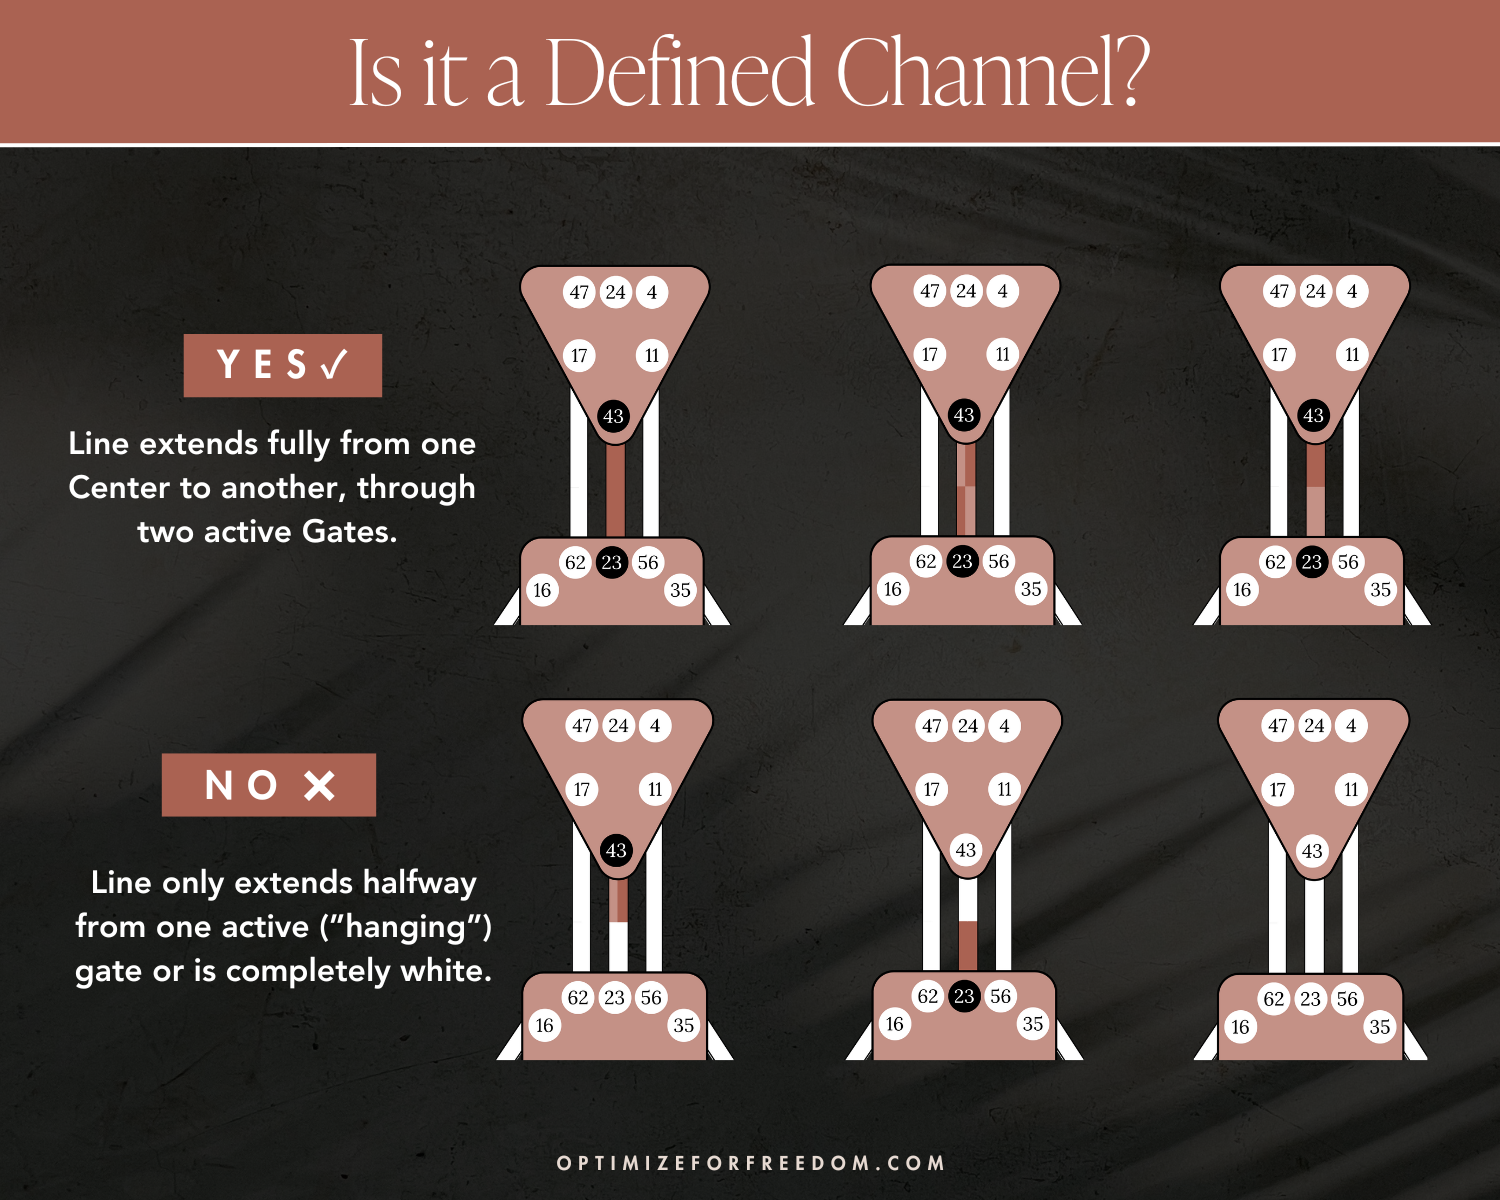
How to Identify Your Defined Channels
If the line connects two Centers and is colored in – the line can be light (unconscious), dark (conscious), or a combination of both – the Channel is DEFINED and represents a consistent part of your energy.
If the line is not FULLY colored in from one Center to another or is white, then the Channel is UNDEFINED, and an inconsistent part of your energy that fluctuates based on your environment.
When a Channel is halfway colored in, this results in what’s known as a “Hanging Gate”, and you may find that you often attract people with the other half of the channel into your life!
Human Design Circuitry
Channels aren’t just individual, energetic pathways. When multiple Channels and Centers connect, they form larger circuits that tell us WHO, HOW, and WHAT the energy is concerned with.
Each Channel belongs to one of three circuit groups:
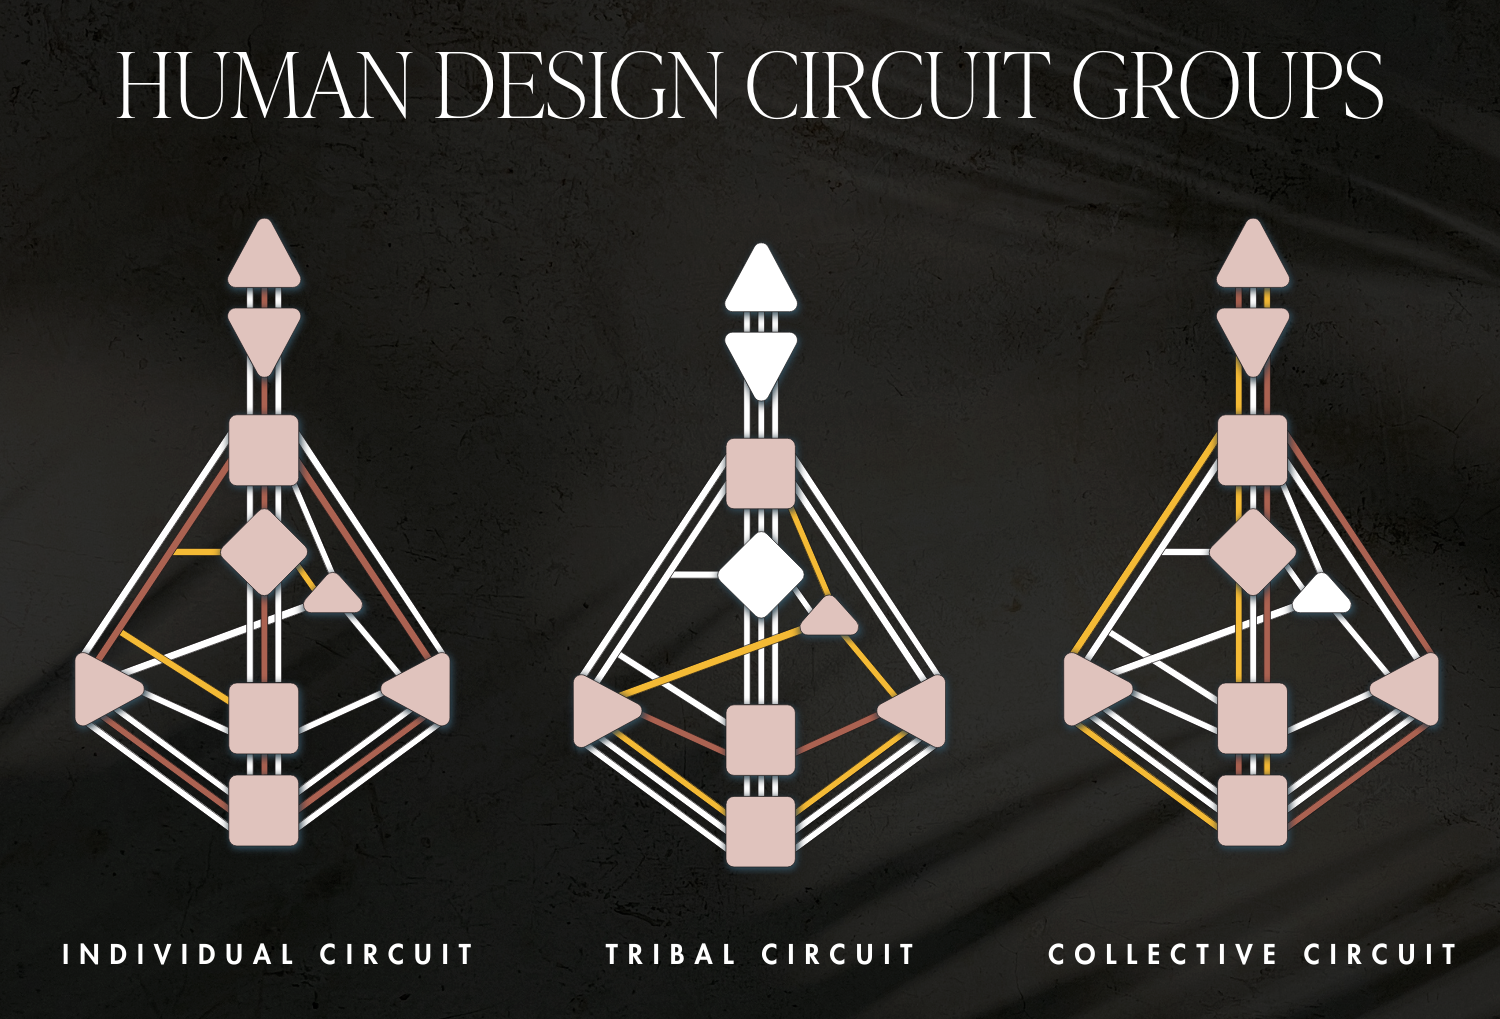
Individual Circuit
The individual circuit emphasizes personal empowerment and self-discovery. If you have a lot of individual circuitry, you might find that you often march to the beat of your own drum.
Tribal Circuit
The tribal circuit has a focus on community, family, and support systems. Those with strong tribal circuitry often place a high value on their close relationships, material prosperity and group dynamics.
Collective Circuit
The collective circuit is all about sharing knowledge and experiences for the betterment of society. People with collective circuitry might have a knack for teaching or enjoy sharing their wisdom and experiences with others.
Diving into your circuitry will tell you a lot about how you’re here to make an impact and contribute to the world. Your Incarnation Cross, which we’ll discuss next, takes this awareness to an even deeper level.
Incarnation Cross
Have you ever wished someone could just TELL you your purpose? Well, you’re in luck!
Because, while defining your purpose is ultimately up to YOU (don’t let any person or system tell you otherwise!), your Incarnation Cross can provide clues to nudge you in the right direction.
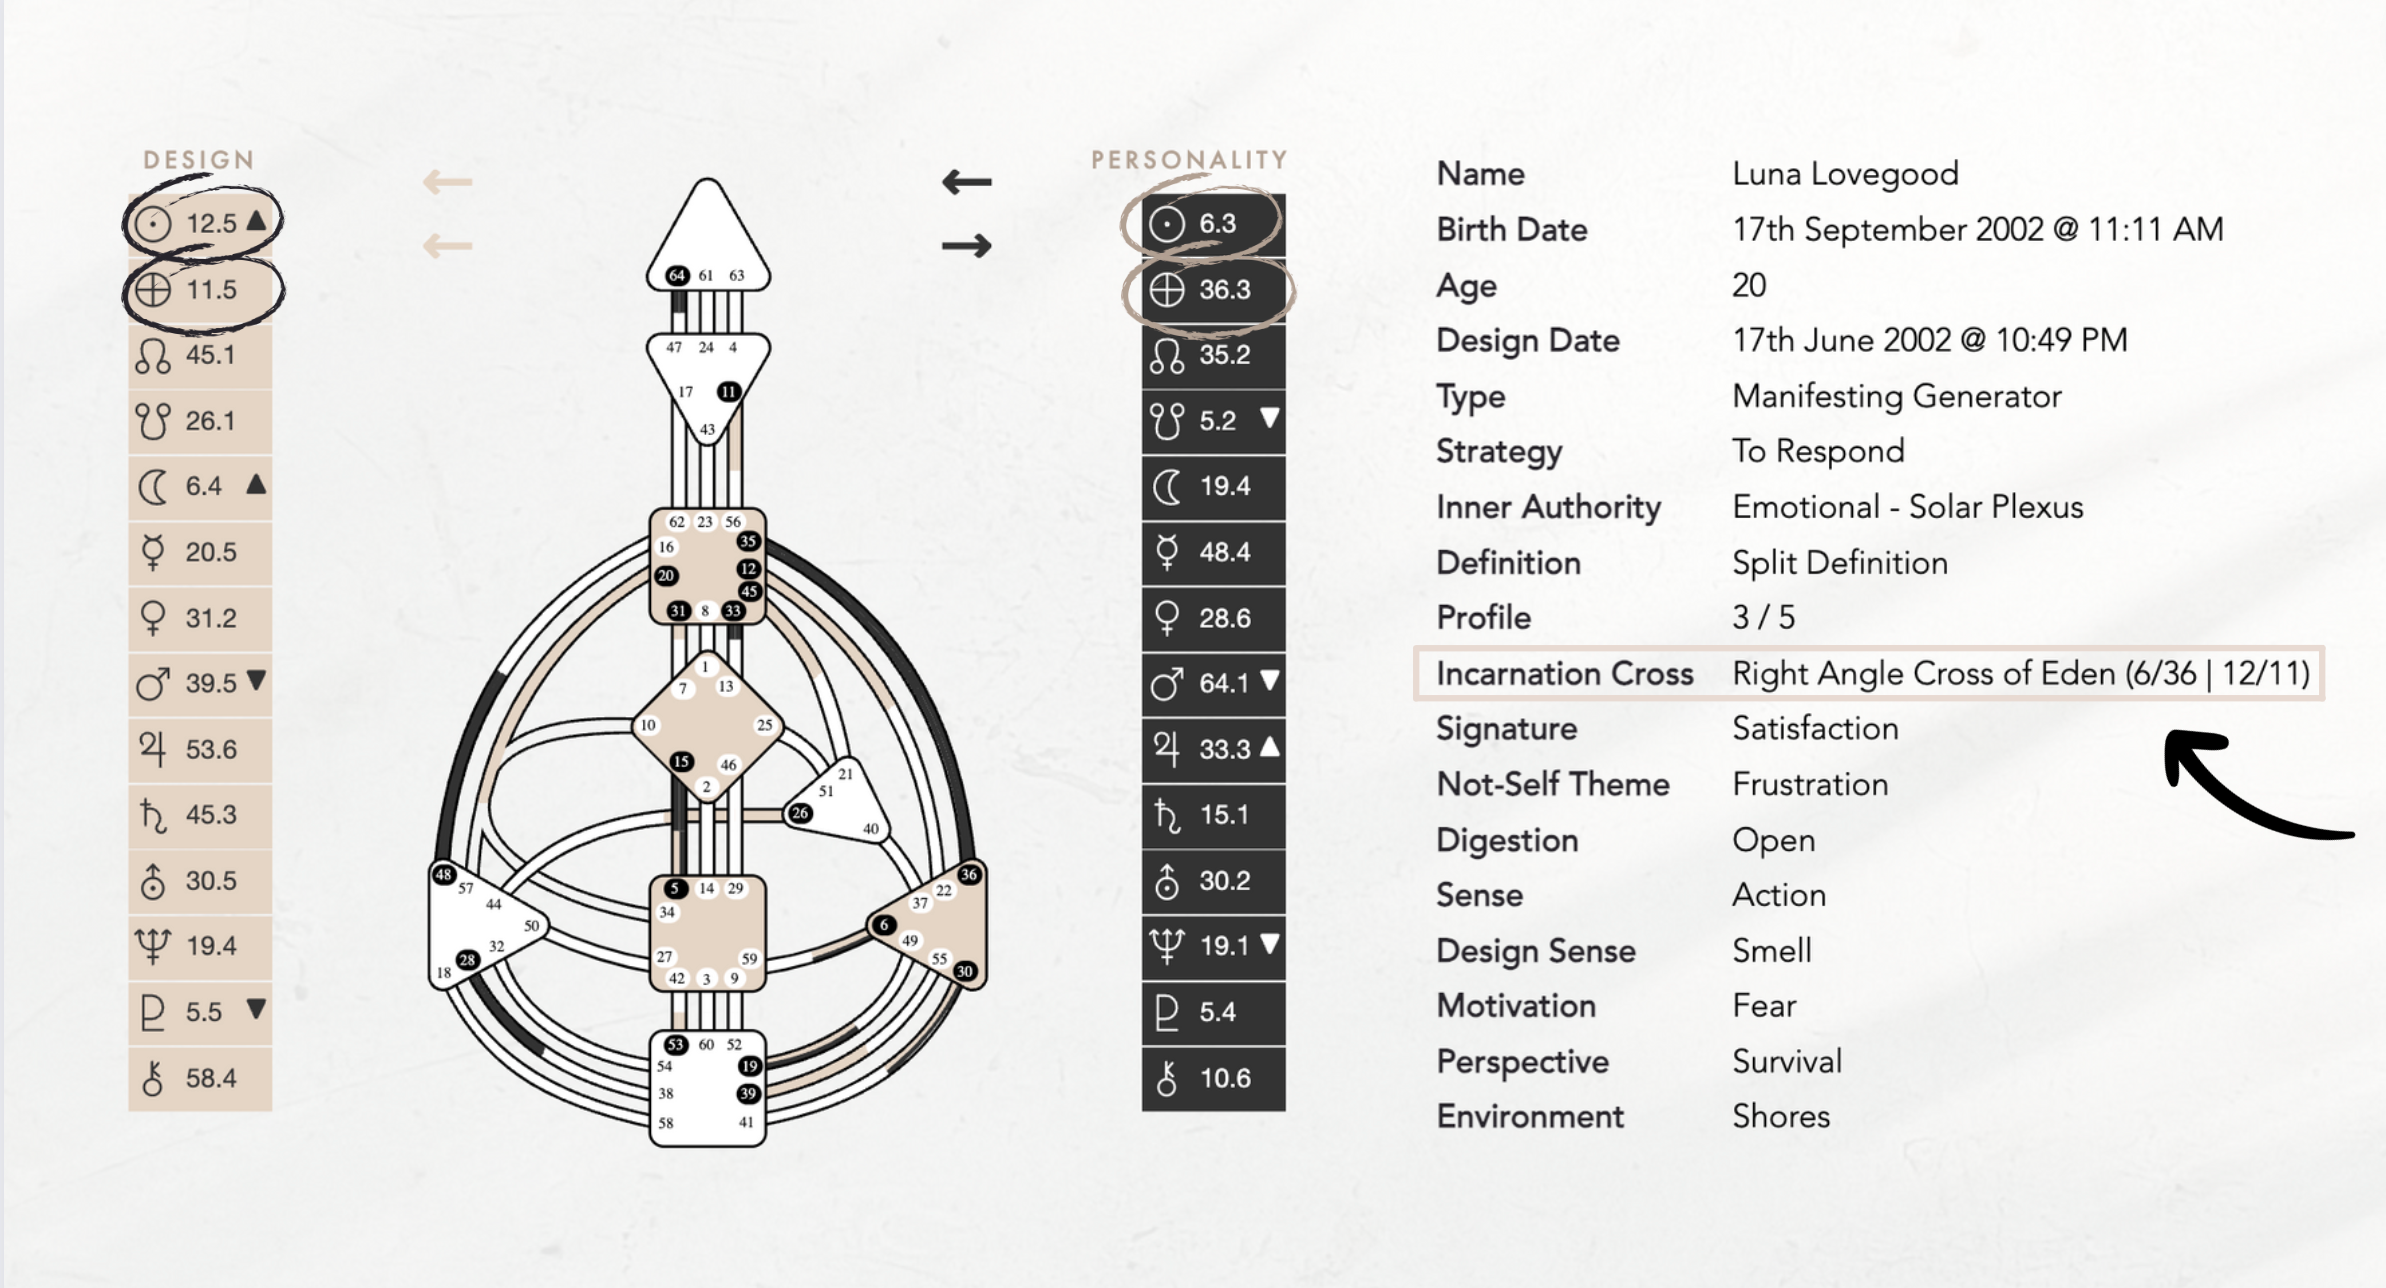
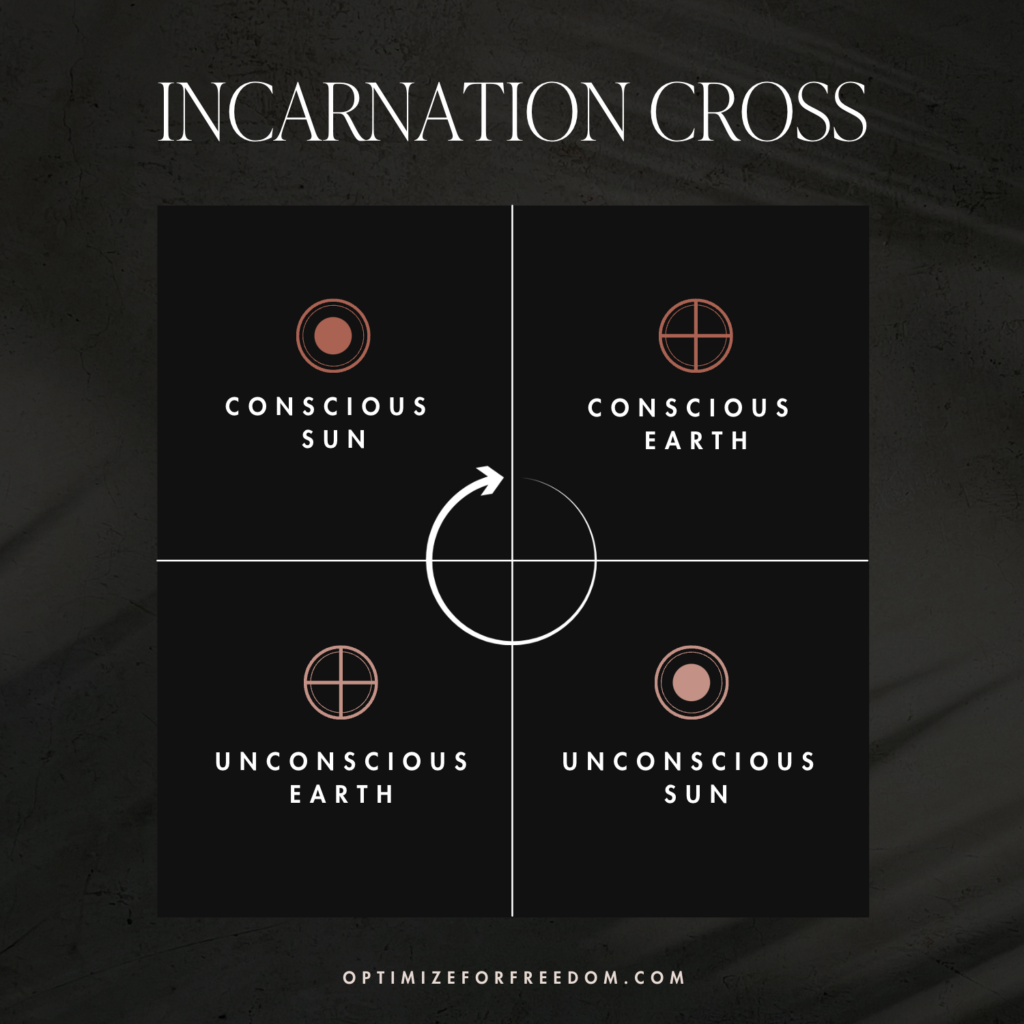
Composed of the energies of four specific Gates, your Incarnation Cross provides insight into the unique path you’re here to explore in your lifetime and the contribution you’re here to make.
The four Gates that make up your Incarnation Cross are derived from two key points in your chart – your Personality (Conscious) Sun and Earth, and your Design (Unconscious) Sun and Earth.
The energy of these Gates blends together, creating a specific theme that defines the essence or purpose of your life’s journey.
Understanding your Incarnation Cross allows you to grasp the bigger picture of your life.
It can also help you understand why you’re drawn to certain opportunities, relationships, or challenges and how they align with your life’s overall purpose.
However, it’s important to know that this isn’t about making rigid predictions or setting in stone a predestined path.
Instead, it’s about recognizing your inherent potential and using this understanding to navigate your life with increased awareness, self-acceptance, and authenticity.
Remember, the journey towards fulfilling your life’s purpose isn’t always linear or straightforward. It’s an ongoing process of self-discovery and growth, so focus on following your Strategy and Authority and the rest will unfold naturally!
Variables (Arrows)
The Variables are represented by the four arrows on your Human Design chart.
They represent a more advanced aspect of the Human Design system that offers insights into how you best absorb, process, and understand information.
Each arrow corresponds to a specific Variable:

Digestion (Determination)
Located in the upper-left position, this Variable points to the most suitable way for you to consume and digest not just food, but information and life experiences as well. Understanding your Determination can guide you in nourishing your body and mind in the most optimal way.
Environment (Cognition)
Found in the lower-left position, this Variable indicates the type of environments that optimize your performance and best support your overall wellbeing.
Perspective (Motivation)
This Variable, found in the lower-right position, suggests the unique lens through which you view and understand the world around you. It informs how you make sense of your experiences and what motivates your actions.
Awareness (Transference)
Located in the top-right position, this Variable relates to your ideal way of learning, collecting data and processing information.
Each Variable arrow points either to the left (indicative of a more active, strategic approach) or to the right (indicating a more receptive, responsive approach).
We’ve barely scratched the surface of all there is to know about the Variables in this post, but don’t worry! We’ll be digging into the details later on in the series.
Putting It All Together: The 5-Step Process to Read Your Human Design Chart
So now that you know what you’re looking at, how do you actually read this thing? Here’s my 5-Step process:
Step 1: Build the Foundation
(Where to look: Type, Strategy & Authority)
Start with the basics: your Type, Strategy, and Authority. Trust me, if you take only ONE thing away from Human Design, make it this. These are your built-in GPS for aligned decision-making. Get these right, and the rest of your chart will unfold naturally—no effort required.
Step 2: Understand How Your Energy Flows
(Where to look: Centers & Definition)
Next, get acquainted with your defined and undefined Centers and how they’re connected (your ‘Definition’).
Notice your Defined Centers, the areas where you have consistent energy and influence others. These often represent consistent strengths that you can lean into.
Next, take note of your undefined or open Centers. These are areas where you’re more adaptable but also potentially more influenced by others and your environment.
Finally, look at your Definition. Are all of your Defined Centers connected to each other or are there separate “parts” of yourself that may be competing or operating at different speeds? Can you process things independently or do you benefit from having others help you work through your thoughts and feelings to connect the dots?
Step 3: Explore Your Role & How You Relate to Others
(Where to look: Profile, Lines, Circuitry, Incarnation Cross)
Looking at your Profile, Circuitry, and Incarnation Cross can help you see how you’re naturally designed to play out your role in life.
For example: Do you learn best by immersing yourself deep in research before taking action or through rolling up your sleeves and learning through a trial and error process? Are you more influential in your close group of friends or to strangers of consequence? Are you here to focus on yourself and march to the beat of your own drum or to share your knowledge and wisdom with others to move society forward?
Grasping these aspects of your chart not only enriches your self-understanding, but also helps you find your place in the social fabric around you, allowing you to navigate your roles and relationships with a newfound sense of clarity and purpose.
Step 4: Dive Into the Details That Make You, YOU!
(Where to look: Channels, Gates, Planets)
Next, it’s time to take a look at the Gates, Channels, and Planet activations in your chart. This is where you can really get into the weeds and start to see all of the little details – the strengths, weaknesses, habits and tendencies – that make you, YOU!
By becoming more aware of your consistent traits and how all of these different energies show up in your life, you can really start to see and appreciate just how special and unique you truly are, allowing you to stop playing the comparison game and show up more confidently as the person you were designed to be!
Step 5: Seeing the Big Picture: Identify Themes in Your Chart
(Where to look: Everywhere!)
This is where the magic happens! Now that you’ve done the foundational work of Steps 1-4, take a step back and look at your chart as a whole.
Try to identify themes or patterns that show up in different parts of your chart. For example, you might see recurring themes of leadership, intuition, innovation, or nurturing others.
By identifying these overarching themes, you’ll uncover a holistic understanding of your true nature, purpose and direction and how you can most naturally and powerfully make your mark on the world.
Revisit & Reflect
Remember, Human Design is a journey of self-discovery. Nothing that you learn should make you feel trapped or disempowered. Approach your chart with a sense of curiosity and use it as a guide, not a cage.
As with any self-awareness tool, it’s helpful to revisit and reflect on your chart regularly. As you evolve, you might interpret or understand certain aspects differently.
I’m a few years into my Human Design journey and am constantly unearthing new insights and making connections I didn’t see before!
Ready to Dive Deeper into Your Human Design?
Whew, that was a lot! If you’re still with me… Congrats 🎉 You now have the basics of your Human Design chart down.
But trust me – we’re just getting started!
Reading your chart is one thing… but knowing how to actually use it in your life? That’s another.
And that’s where Astra comes in.
Astra: Your AI-Powered Human Design Guide
Astra is your on-demand AI Human Design reader here to give you personalized insights anytime, anywhere. She’ll help you:
✨ Get clear, straight-to-the-point insights about your chart (without the overwhelm).
✨ Understand what your design actually means in your day-to-day life.
✨ Start making aligned decisions with confidence, so you can stop second-guessing yourself.
Instead of spending hours Googling, trying to piece everything together yourself, let Astra simplify the process for you!
Additional Human Design Resources

The official Human Design textbook:
The Definitive Book of Human Design
An easy-to-understand beginner’s guide:
The Human Design Workbook
READY TO TAKE YOUR HUMAN DESIGN EXPERIMENT TO THE NEXT LEVEL?
Download Your FREE 2026
Human Design Transit Calendar & Guide

COPYRIGHT © 2026 OPTIMIZE FOR FREEDOM, LLC. All rights reserved. LEGAL.